Conflux101
- Overview
- 开发工具
- Glossary
- 内置合约
- AdminControl
- SponsorWhitelistControl
- Staking
- ConfluxContext
- PoSRegister
- CrossSpaceCall
- ParamsControl
- Misc
- EVM 开发常用工具
- DevTips
- Week 1 - 7.4
- Week2-7.11
- Week3-7.18
- Week4 - 7.25
- Week5 - 8.1
- Week6- PoS
- Week7-8.15
- Week8-8.21
- Week9 - 8.29
- Week10-NFT 标准
- Week11-9.13
- Week12 Contract address
- Week13 - 9.26
- Week14-节点运行常见问题
- Week15 - 10.17
- Week16: 10.24 - 10.28 python-sdk
- Week 17 - 10.31 代理模式大阅兵
- Week18-Conflux 跨链桥汇总
- Week19- 11.14
- Week 20 11.28~
- Gas 科普
- EN Translate
- Accounts
- Token Standard
- Core Space 与 eSpace 互操作介绍
Overview
Conflux Network 是一个基于自主创新树图共识机制的高性能区块链网络,在完全去中心化的前提之下,可达到 3000 TPS,远超比特币和以太坊。同时实现虚拟机 EVM 兼容, 大大减少项目移植工作量
Fluent 钱包
基本概念
生态应用
如何运行节点
如果开发 Defi 或 NFT 应用
常见问题
开发工具
SDKs
Other Libs
- cip-23
Tools
Glossary
TreeGraph
树图账本结构

Epoch
树图 Pivot chain 上的每个 block 定义一个 Epoch,一个 Epoch 可能会包含多个 block ,EpochNumber 从 0 自增。
Base32 地址
采用 base32 编码格式的地址,具体参看 CIP-37
Era
每 20000 个 Epoch 是一个 Era
Checkpoint
在 era 的分界点上会创建 Checkpoint,checkpoint 之前的 consensus 相关数据会删掉(fullnode),共识算法有关
Snapshot
Snapshot是 state 相关的,每 2000 个 epoch 重新 merge 一个 state 的 snapshot
内置合约
AdminControl
总览
AdminControl 合约是一款用于合约开发的调试工具。 在交易过程中创建合约时,当前交易的发送者会自动成为合约的管理者(admin)。
管理者 admin 的地址可以通过调用接口 setAdmin(address contractAddr, address newAdmin) 将管理权益转交给其他的普通用户地址或零地址。而一个合约不可成为管理者。
合约的管理者具备多个管理权限。管理者可以调用 destroy(address contractAddr) 接口以销毁合约,该操作就像通过合约调用 suicide() 函数那样。而SponsorWhitelist内部合约提供了一些管理员专用的函数。这些函数可以更新赞助者机制中的白名单。我们将在随后进行介绍。
注意:对于所有和管理者权限相关的接口,不论调用成功与否都不会在执行时触发任何错误或异常。 例如,如果一个非管理者地址尝试将管理者地址转移给其自己,该交易会成功但不会造成任何改动。
如果合约拥有非零的管理者地址,ConfluxScan会将合约标记为调试模式。因此请记住,如果你认为你的合约已经准备好进入实际生产环境,你应当将管理者地址设置为零地址。
AdminControl 合约同时也提供了一个可以被任何人调用的查询接口 getAdmin(address contractAddr) 。
需要注意的细节:
- 默认管理者(交易发送者)是在合约开始创建时设置的。因此,如果发送者
A创建合约B并在合约构建时设置管理者为C,在合约部署后合约的管理者为C。 - 然而,如果发送者
A调用合约B,随后合约B创建合约C并在合约创建时将管理者设置为D,则该设置会失败,原因是:C合约的管理者是A,但创建合约C的发起者是B。 - Conflux会引入一种特别的规则。在案例2中,如果
D是零地址,则管理者设置成功。这意味着合约创建时可以显示地声明其不需要管理者。
样例
考虑到您可以已经部署了一个地址为 contract_addr 的合约。管理者可以通过调用AdminControl.setAdmin(contract_addr, new_admin) 以变更管理员以及通过调用AdminControl.destroy(contract_addr) 来销毁合约。
const PRIVATE_KEY = '0xxxxxxx';
const cfx = new Conflux({
  url: 'http://test.confluxrpc.org',
  logger: console,
});
const account = cfx.wallet.addPrivateKey(PRIVATE_KEY); // create account instance

const admin_contract = cfx.InternalContract('AdminControl')
// to change administrator
admin_contract.setAdmin(contract_addr, new_admin).sendTransaction({
  from: account,
}).confirmed();

// to kill the contract
admin_contract.destroy(contract_addr).sendTransaction({
  from: account,
}).confirmed();
SponsorWhitelistControl
总览
Conflux实现了一种赞助机制来补贴用户对智能合约的使用。 因此,只要对合约调用的交易被赞助(通常由Dapps的运营商赞助),使用余额为零的新帐户也能够调用智能合约。 通过引入内置的SponsorControl合约能够记录和管理智能合约的赞助信息。
在进行子调用(Message Call)时,Conflux不会再次检查赞助情况。例如,如果一个普通用户地址 A 调用合约 B ,然后合约 B 调用合约 C, Conflux仅仅会检查 A 是否被合约 B 赞助。如果 A 被赞助,B 会在交易执行过程中负担全部的燃料费用和/或存储抵押费用,包含 B 调用 C 的费用。换句话说,只有交易的发送者才能被赞助,B 不可能被赞助。
SponsorControl合约为每一个用户建立的合约保留了如下的信息:
-
sponsor_for_gas:是提供燃料补贴的账户; -
sponsor_for_collateral:是提供存储抵押补贴的账户; -
sponsor_balance_for_gas:可用于燃料补贴的余额; -
sponsor_balance_for_collateral: 可用于提供存储抵押补贴的余额; -
sponsor_limit_for_gas_fee:是向每笔交易赞助燃料费用的上界; -
whitelist:有资格获得补贴的普通用户地址列表,全零地址则代表所有用户地址。只有合约自身和管理员有权限改动该列表。
有两种资源能够被赞助:燃料费用和存储抵押物。
- *对于燃料费用: 如果一笔交易使用非空的
sponsor_for_gas调用智能合约且交易发送者处于合约的whitelist列表内,且交易指定的燃料费用在sponsor_limit_for_gas_fee范围内,交易的燃料消耗将从合约的sponsor_balance_for_gas中支付(如果足够的话),而不是由交易发送者的账户余额支付,如果sponsor_balance_for_gas无法承担燃料消耗,则交易失败。否则,交易发送者应支付燃料费用。 -
对于存储抵押物: 如果一笔交易使用非空的
sponsor_balance_for_collateral调用智能合约且交易发送者处于合约的whitelist列表内,在执行交易的过程中存储抵押物将从智能合约的sponsor_balance_for_collateral中扣除,并将这些修改后的存储条目所有者相应设置为合约地址。 否则,交易发送方应在执行过程中支付存储抵押物。
当一个合约被创建的时候,它的 sponsor_for_gas 和 sponsor_for_collateral 会被置为零地址,相应的燃料补贴余额也是零。 提供燃料补贴的账户和存储押金补贴的账户都可以通过与 SponsorControl 合约交互完成。合约当前的赞助账户可以直接追加补贴余额,也可以在满足一定条件下提高 sponsor_limit_for_gas_fee。其他普通用户账户如果提供高于当前余额的资金,可以将原先的赞助者取而代之。更具体的细节如下。
赞助者替换
为了替换合约的 sponsor_for_gas ,新的赞助者需要调用函数 setSponsorForGas(address contractAddr, uint upperBound) 并向内置合约转移一笔资金。只有在满足下述条件时才能完成燃料费用赞助者的替换:
- 转移的资金应当比合约当前的
sponsor_balance_for_gas高。 -
sponsor_limit_for_gas_fee的新值(被指定为upperBound参数)应当不小于原赞助者的限制,除非原本的sponsor_balance_for_gas无法负担原赞助者的限制。 - 转移的资金应为新限额的1000倍以上,以便足以补贴至少
1000次调用合约的交易。
如果上述条件满足,剩余的 sponsor_balance_for_gas 会返还给原赞助人 sponsor_for_gas ,随后转给内置合约的资金被注入 sponsor_balance_for_gas。 sponsor_for_gas 以及 sponsor_limit_for_gas_fee 会根据新赞助人指定的值进行更新。如果上述条件没有满足,会触发异常。
对 sponsor_for_collateral 的替换与替换燃料赞助者的方式类似,处理没有燃料限额的逻辑。方法是 setSponsorForCollateral(address contractAddr) 。新的赞助者需要向合约转移一笔比目前余额更多的资金。随后当前 sponsor_for_collateral 赞助的金额会被全部退还,即 sponsor_balance_for_collateral 和合约当前所有存储抵押金之和,两个与存储押金赞助相关的字段将按照新赞助者的要求进行相应的变更。
一个合约账户也被允许成为赞助者。
提高赞助额度
赞助者可以在无需更换赞助者的情况下提供额外的赞助资金。在该情况下,赞助人需要调用函数 setSponsorForGas(address contractAddr, uint upperBound) 或 setSponsorForCollateral(address contractAddr) 并满足赞助者替换的三条要求中的条件 2,3. 如果满足相关需求,交易的赞助资金会被加入赞助余额中且 sponsor_limit_for_gas_fee 也会相应地被更新。
白名单列表维护
只有合约本身或合约管理者可以更新合约白名单列表。赞助者则无权变更白名单列表。
合约可以通过调用 addPrivilege(address[] memory) 将任何地址加入到白名单列表中。这意味着如果 sponsor_for_gas 被设置,合约会为白名单列表中的账户支付存储押金。全零地址是一个特殊的地址 0x0000000000000000000000000000000000000000 。如果该地址被加入白名单列表,则所有调用该合约的交易都会被赞助。合约还可以调用方法 removePrivilege(address[] memory) 将部分正常账户从白名单列表中移除。移除一个不存在的地址不会导致错误或异常。
需要注意的细节:
- 一个合约地址也可被加入到白名单列表中,但该操作无任何意义,因为只有交易的发送者可以被赞助。
合约的管理者可以使用 addPrivilegeByAdmin(address contractAddr, address[] memory addresses) 及 removePrivilegeByAdmin(address contractAddr, address[] memory addresses) 以维护白名单列表。
样例
假定你有一个如下所示的简单合约。
pragma solidity >=0.4.15;

import "https://github.com/Conflux-Chain/conflux-rust/blob/master/internal_contract/contracts/SponsorWhitelistControl.sol";

contract CommissionPrivilegeTest {
    mapping(uint => uint) public ss;

    function add(address account) public payable {
        SponsorWhitelistControl cpc = SponsorWhitelistControl(0x0888000000000000000000000000000000000001);
        address[] memory a = new address[](1);
        a[0] = account;
        cpc.addPrivilege(a);
    }

    function remove(address account) public payable {
        SponsorWhitelistControl cpc = SponsorWhitelistControl(0x0888000000000000000000000000000000000001);
        address[] memory a = new address[](1);
        a[0] = account;
        cpc.removePrivilege(a);
    }

    function foo() public payable {
    }

    function par_add(uint start, uint end) public payable {
        for (uint i = start; i < end; i++) {
            ss[i] = 1;
        }
    }
}
部署合约且地址为 contract_addr 如果有些人希望赞助燃料费用,他/她可以发送如下的交易:
const PRIVATE_KEY = '0xxxxxxx';
const cfx = new Conflux({
  url: 'http://test.confluxrpc.org',
  logger: console,
});
const account = cfx.wallet.addPrivateKey(PRIVATE_KEY); // create account instance

const sponsor_contract = cfx.InternalContract('SponsorWhitelistControl');
sponsor_contract.setSponsorForGas(contract_addr, your_upper_bound).sendTransaction({
  from: account,
  value: your_sponsor_value
}).confirmed();
如果需要赞助存储抵押物,可以简单的将 setSponsorForGas(contract_addr, your_upper_bound) 替代为 setSponsorForCollateral(contract_addr) 即可。
之后你可以使用 addPrivilege 和 removePrivilege 为你的合约维护 whitelist 。特殊的全零地址 0x0000000000000000000000000000000000000000 则表示 所有人都处于 whitelist 中。需要谨慎使用。
you_contract.add(white_list_addr).sendTransaction({
  from: account,
})

you_contract.remove(white_list_addr).sendTransaction({
  from: account,
})
随后在 whitelist 中的账户在调用 you_contract.foo() 或 you_contract.par_add(1, 10) 时,不会支付任何费用。
Staking
总览
Conflux引入权益质押机制的原因有两个:一、权益机制提供了一种对占用存储空间更好的收费方式(相比于“一次付费,永久占用”)。二、该机制还有助于定义分散治理中的投票权。
在顶层,Conflux实现了一个内置的Staking合约,以记录所有账户的权益信息。通过向该合约发送交易,用户(包括外部用户和智能合约)可以存入/提取资金,也被称为合约内的权益。
用户可以通过调用 deposit(uint amount) 来存入用于抵押的金额,随后 amount 数量的资金将从其 balance 移至 stakingBalance. 需要注意的是该函数不是 payable 的,用户只需要指定抵押的金额而无需将资金转入到内部合约中。
用户还可以通过调用 withdraw(uint amount) 来提取余额。调用者可以调用该函数从Conflux质押合约提取部分代币。抵押资金将会及时的转入用户余额中。所有提款的顺序将按照先到先服务的方式进行处理。
锁定与投票权
通过锁定质押余额,用户可获取投票权以进一步进行链上治理。通过调用 voteLock(uint amount, uint unlock_block_number) 函数,一个帐户可以做出如下承诺:“我的 stakingBalance 在未来 unlock_block_number 中将始终具有至少 amount 的资金”。单个账户可以做出多个承诺,比如说“今年我将至少持有10CFX,并且在明年至少持有5CFX。” **一旦做出承诺,无法取消!**但是该账户可通过锁定更多的金额覆盖原有的承诺。每当账户尝试提取 stakingBalance 时,内部合约会检查剩余余额是否与锁定承诺吻合。
在此处我们将通过几个样例介绍锁定余额的逻辑细节。假设Conflux在今年的剩余时间将产生 x 个区块,在明年的产生 y 个区块。由于Conflux网络每秒能生成两个区块,因此 y 近似等于 2 * 60 * 60 * 24 * 365 。而 x 取决于您何时阅读到该文章。
- 假设一个账户的
stakingBalance中有10CFX,如果其调用voteLock(100 * 10^18, x),说明账户尝试锁定 100CFX. 但由于其缺少足够的stakingBalance,交易执行失败。 - 然而,如果该账户调用
voteLock(8 * 10^18, x),则交易会成功。 - 随后,如果该账户调用
voteLock(6 * 10^18, x+y),交易同样会成功。这意味着交易执行后 2CFX 在今年结束时解锁,而另外 6CFX 会被锁定直到明年结束。 - 如果账户再调用
voteLock(0, x),没有任何事情会发生。在交易执行过程中交易不会触发错误。内置合约会将此调用视为无意义的承诺:该帐户在步骤 2、3 做出的旧承诺有效的前提下,再次承诺在今年结束前至少锁定 0 CFX. - 如果该账户调用
voteLock(9 * 10^18, x+y),则两个较老的承诺将会因为“锁定 9CFX 直到明年结束是一个更强的承诺”被覆盖。
锁定对利息无任何影响。当账户成功取出抵押余额时,利息会将照常计算。
在任何时间,每一个锁定的金额将根据其解锁时间被分配0到1的表决权。锁定期超过1年的部分将拥有全额的投票权利。查看 Conflux Protocol Specification 章节 8.3.2 获取更多信息。
样例
const PRIVATE_KEY = '0xxxxxxx';
const cfx = new Conflux({
  url: 'http://test.confluxrpc.org',
  logger: console,
});
const account = cfx.wallet.addPrivateKey(PRIVATE_KEY); // create account instance

const staking_contract = cfx.InternalContract('Staking');
// deposit some amount of tokens
staking_contract.deposit(your_number_of_tokens).sendTransaction({
  from: account,
}).confirmed();

// withdraw some amount of tokens
staking_contract.withdraw(your_number_of_tokens).sendTransaction({
  from: account,
}).confirmed();

// lock some tokens until some block number
staking_contract.voteLock(your_number_of_tokens, your_unlock_block_number).sendTransaction({
  from: account,
}).confirmed();
ConfluxContext
ConfluxContext 内置合约可用于在 Solidity 中获取当前网络信息,目前包含:epochNumber, posHeight, finalizedEpochNumber
pragma solidity >=0.4.15;

contract ConfluxContext {
    /*** Query Functions ***/
    /**
     * @dev get the current epoch number
     * @return the current epoch number
     */
    function epochNumber() public view returns (uint256) {}
    /**
     * @dev get the height of the referred PoS block in the last epoch
`    * @return the current PoS block height
     */
    function posHeight() public view returns (uint256) {}
    /**
     * @dev get the epoch number of the finalized pivot block.
     * @return the finalized epoch number
     */
    function finalizedEpochNumber() public view returns (uint256) {}
}
PoSRegister
简介
PoSRegister合约主要为PoW用户在PoS上注册提供了相应的通道。通过质押与锁仓一定数量的代币后调用合约中的方法从而使得PoW账户与PoS账户进行绑定。绑定后在锁仓代币数量足够的前提下实现增加与减少投票权重的功能。该合约主要实现的功能有:注册(绑定)PoS全节点;增加,减少投票权重;查询PoS节点当前投票权重;PoS地址与PoW地址间的互相转换
前提概念
- conflux有两条链,一条PoW链,主要处理事务;一条PoS链,对PoW的区块进行验证
- 质押并锁仓的CFX的个数最少为1000
- 1 PoS 投票权重 = 1000 CFX
- 增加,减少投票权重的单位是 vote power
- 锁定到提现有一个时间限制,在staking合约中调用
voteLock()时需要指定解锁时间
前置条件
- 通过
staking合约进行质押并锁仓 - 锁仓金额不小于1000CFX
方法阐述
register
概念
PoW账户与PoS账户进行绑定的通道, 当PoW账户的锁仓金额达到1000CFX时,可以调用该方法来为PoS节点与PoW建立连接,目前1000CFX可以换取1 vote power
前置条件
- 有一个正在运行的PoS本地节点
- 在本地调用
conflux rpc local pos register --power 1, 并复制第一个数据以供调用register使用
输入参数
- indentifier: PoS节点的标识符
- votePower: 注册时需要换取的投票权重
- blsPubKey: PoS节点的blsPubKey
- vrfPubKey: PoS节点的vrfPubKey
- blsPubKeyProof: PoS节点的blsPubKeyProof
输出参数
无
increaseStake
概念
在PoW账户与PoS账户建立连接, 若用户有提高自己投票权重的需要, 可以调用该方法将锁仓后的CFX置换为投票权重
前置条件
- PoW账户与PoS账户建立了连接
- 新锁仓的CFX大于1000CFX
输入参数
- votePower: 需要提高的投票权重
输出参数
无
retire
概念
在PoW账户与PoS账户建立连接, 若PoW账户有解除和PoS账户相绑定的需要,可调用该方法通过部分或全部解除锁仓来实现绑定的解除功能
前置条件
- PoW账户与PoS账户建立了连接
输入参数
- votePower: 需要减少的投票权重
输出参数
无
getVotes
概念
通过调用该方法来获取质押的token的votes和解除锁仓后的token的votes
前置条件
- PoW账户与PoS账户建立了连接
输入参数
- identifier: PoS节点的标识
输出参数
- totalStakedVotes: 质押的token的votes
- totalUnlockedVotes: 解除锁仓后的token的votes
identifierToAddress
概念
根据PoS账户地址获取对应的PoW地址
前置条件
- PoW账户与PoS账户建立了连接
输入参数
- identifier: PoS账户的地址
输出参数
- address:PoW地址
addressToIdentifier
概念
根据PoW账户地址获取对应的PoS地址
前置条件
- PoW账户与PoS账户建立了连接
输入参数
- address: PoW账户的地址
输出参数
- identifier:PoS地址
代码
// SPDX-License-Identifier: MIT
pragma solidity >=0.5.0;

interface PoSRegister {
    /**
     * @dev Register PoS account
     * @param indentifier - PoS account address to register
     * @param votePower - votes count
     * @param blsPubKey - BLS public key
     * @param vrfPubKey - VRF public key
     * @param blsPubKeyProof - BLS public key's proof of legality, used to against some attack, generated by conflux-rust fullnode
     */
    function register(
        bytes32 indentifier,
        uint64 votePower,
        bytes calldata blsPubKey,
        bytes calldata vrfPubKey,
        bytes[2] calldata blsPubKeyProof
    ) external;

    /**
     * @dev Increase specified number votes for msg.sender
     * @param votePower - count of votes to increase
     */
    function increaseStake(uint64 votePower) external;

    /**
     * @dev Retire specified number votes for msg.sender
     * @param votePower - count of votes to retire
     */
    function retire(uint64 votePower) external;

    /**
     * @dev Query PoS account's lock info. Include "totalStakedVotes" and "totalUnlockedVotes"
     * @param identifier - PoS address
     */
    function getVotes(bytes32 identifier) external view returns (uint256, uint256);

    /**
     * @dev Query the PoW address binding with specified PoS address
     * @param identifier - PoS address
     */
    function identifierToAddress(bytes32 identifier) external view returns (address);

    /**
     * @dev Query the PoS address binding with specified PoW address
     * @param addr - PoW address
     */
    function addressToIdentifier(address addr) external view returns (bytes32);

    /**
     * @dev Emitted when register method executed successfully
     */
    event Register(bytes32 indexed identifier, bytes blsPubKey, bytes vrfPubKey);

    /**
     * @dev Emitted when increaseStake method executed successfully
     */
    event IncreaseStake(bytes32 indexed identifier, uint64 votePower);

    /**
     * @dev Emitted when retire method executed successfully
     */
    event Retire(bytes32 indexed identifier, uint64 votePower);
}
CrossSpaceCall
简介
CrossSpaceCall 合约为conflux中coreSpace与ESpace沟通的桥梁。该合约能够实现在coreSpace中的账户在ESpace中互相转账,部署合约,调用合约及查询与CoreSpace中账户相对应的ESpace中账户的的nonce与balance
前提概念
- 在conlux中有CoreSpace与ESpace两个域,对应着conflux与以太坊两条链;
- CoreSpace中的账户与ESpace中的账户有一一对应关系;
前置条件
- Conflux稳定运行
方法阐述
createEVM
概念
通过调用该方法,在espace中创建合约(合约地址可通过事件获得,也可通过解析call方法调用合约返回的数据来获得相应的合约地址)
注: 由于call方法不改变状态,且是将当前账户的nonce+1来作为生成合约地址的数据,因此需要先调用call方法获得合约地址,再去调用createEVM来获得相应的合约地址
输入参数
- init 创建合约的字节码
输出参数
- 合约地址
transferEVM
概念
向PoW账户映射的Espace账户中转帐
前置条件
- conflux链稳定运行
输入参数
- to: PoW账户映射的Espace账户的地址
输出参数
- 转账信息
callEVM
概念
通过该方法调用ESpace下的合约(合约地址可通过事件获得,也可通过解析call方法调用合约返回的数据来获得相应的合约地址)
输入参数
- to: PoW账户映射的Espace账户的地址
- data: 调用合约所需要的参数encode后的数据
输出参数
- 调用合约成功信息
staticCallEVM
概念
通过该方法静态调用ESpace下的合约
输入参数
- to: CroeSpace账户映射的Espace账户的地址
- data: 调用合约所需要的参数encode后的数据
输出参数
- 调用合约成功信息
withdrawFromMapped
概念
从ESpace账户中收回相应的代币至其映射的CoreSpace账户
输入参数
- value: 回收的金额
输出参数
无
mappedBalance
概念
查询CoreSpace账户映射的CoreSpace账户的余额
输入参数
- address: CoreSpace账户的地址
输出参数
- 对应的余额
mappedNonce
概念
查询CoreSpace账户映射的CoreSpace账户的nonce
输入参数
- address: CoreSpace账户的地址
输出参数
- 对应的nonce
代码
// SPDX-License-Identifier: MIT
pragma solidity >=0.5.0;

interface CrossSpaceCall {

    event Call(bytes20 indexed sender, bytes20 indexed receiver, uint256 value, uint256 nonce, bytes data);

    event Create(bytes20 indexed sender, bytes20 indexed contract_address, uint256 value, uint256 nonce, bytes init);

    event Withdraw(bytes20 indexed sender, address indexed receiver, uint256 value, uint256 nonce);

    event Outcome(bool success);

    function createEVM(bytes calldata init) external payable returns (bytes20);

    function transferEVM(bytes20 to) external payable returns (bytes memory output);

    function callEVM(bytes20 to, bytes calldata data) external payable returns (bytes memory output);

    function staticCallEVM(bytes20 to, bytes calldata data) external view returns (bytes memory output);

    function withdrawFromMapped(uint256 value) external;

    function mappedBalance(address addr) external view returns (uint256);

    function mappedNonce(address addr) external view returns (uint256);
}
ParamsControl
一般而言,区块链需要通过硬分叉(hardfork)才能更改区块奖励等全局参数。Conflux引入ParamsControl内置合约,使得DAO能够在链上投票来调整Conflux的链参数,如PoW的每个区块的出块奖励,或PoS链上的利率。ParamsControl内置合约由CIP-94引入,CIP-94 介绍页面进行了一定的介绍。
合约接口
// SPDX-License-Identifier: MIT

pragma solidity >=0.8.0;

interface ParamsControl {
    struct Vote {
        uint16 topic_index;
        uint256[3] votes;
    }

    /*** Query Functions ***/
    /**
     * @dev cast vote for parameters
     * @param vote_round The round to vote for
     * @param vote_data The list of votes to cast
     */
    function castVote(uint64 vote_round, Vote[] calldata vote_data) external;

    /**
     * @dev read the vote data of an account
     * @param addr The address of the account to read
     */
    function readVote(address addr) external view returns (Vote[] memory);

    /**
     * @dev Current vote round
     */
    function currentRound() external view returns (uint64);

    /**
     * @dev read the total votes of given round
     * @param vote_round The vote number
     */
    function totalVotes(uint64 vote_round) external view returns (Vote[] memory);

    /**
     * @dev read the PoS stake for the round.
     */
    function posStakeForVotes(uint64) external view returns (uint256);

    event CastVote(uint64 indexed vote_round, address indexed addr, uint16 indexed topic_index, uint256[3] votes);
    event RevokeVote(uint64 indexed vote_round, address indexed addr, uint16 indexed topic_index, uint256[3] votes);
}
Misc
Tx Pool GC Rule
After receiving a valid new transaction from an account:
- If there is an old transaction from the same sender with the same nonce, replace the old transaction if any of the conditions holds:
- the
epoch_heightof the new transaction is 200000 more than the old one - the new transaction has a higher gas price
- the new transaction has the same gas price and a higher
epoch_height
- the
- If the transaction pool is full, try to garbage collect an old transaction:
- Try to garbage collect a transaction that has been packed (packed but not executed transactions will be inserted back to the tx pool later). This is the normal case when we receive a new transaction.
- If all transactions have not been packed, try to garbage a transaction that is not ready to be packed (with a non-consecutive nonce or not enough balance).
- If all transactions can be packed, choose a transaction (if an account has many ready transaction with consecutive nonces, only the one with the least nonce is considered here) with the least gas price. If the gas price is less than that of the newly received transaction, garbage collect this chosen old transaction.
- If the transaction pool is not full now, insert the new transaction. Otherwise, discard the new transaction.
cfx_estimate 接口行为
参数缺省行为
当输入缺少一些域时,一些检查会被跳过。
- 没有指定
from时,跳过所有和balance相关的检查。 - 没有指定
gas_price时,忽略对交易费检查,忽略对 Sponsor Gas Upper Bound 的检查。 - 没有指定
nonce时,自动填入当前正确的 nonce. (指定nonce时,按指定 nonce 执行,但交易不会因 nonce 失败) - 没有指定
value时,默认为 0 - 没有指定
data时,默认为空 - 没有指定
to时,默认为创建合约。
冗余参数
Estimate 本身是用来估计 gas 和 storage collateral, 但接口同时允许用户输入 gas 和 storage collateral. 这是一种“带着答案问问题”的请求,estimate 执行如下逻辑。
指定 gas
- 使用指定的
gas进行交易执行,这是除 gas 消耗超出 15 million 上限外,唯一可能出现OutOfGas的情形。 - 如同时指定
from和gas_price,会在估算交易执行时扣交易费。其余情形只会在交易执行结束后复检交易费。
指定 storage limit
- 估算交易执行时全程忽略传入的
storage_limit,在全部估算结束后,判断给定的 storage limit 是否足够。
其他
- 当 Storage 被 Sponsor 时,执行是不检查 storage_limit 的,这是 Conflux 自身的逻辑。
实现思路
在模拟执行时尽量删减逻辑检查,将逻辑检查推后至估出 gas 与 storage 消耗后。
- Gas 消耗不受是否被 sponsor 影响,因此直接给足够大的 gas limit (不收交易费) 执行
- Storage 消耗与是否被 sponsor 影响很大,因此跑两遍,分别是被 sponsor 和不被 sponsor.
PoS 介绍
EVM 开发常用工具
合约开发常用工具
- Truffle
- hardhat
- Foundry
- Remix
- https://tenderly.co/
DevTips
Conflux 开发小窍门,每日一 Tip
Week 1 - 7.4
Day1 - CFX 的单位
CFX 是 Conflux 网络的原生货币,也是该货币的基本单位,除此之外还有另外两个单位也比较常用 Drip 和 GDrip
- Drip 是代币的最小单位,不可再分隔,
1 CFX = 10^18 Drip - Gdrip 是中间单位,
1 CFX = 10^9 GDrip,1 GDrip = 10^9 Drip
另外还有一个单位 uCFX 1 uCFX = 10^12 Drip(参看黄皮书) uCFX 使用比较少。
GDrip 在发送交易时设置燃气费价格较为常见,一般设置为 1-100 GDrip
Day2 - EpochNumber Tag
在访问 Epoch 相关的 RPC 方法时,通常可以指定一个具体的 hex number 作为参数,除此之外还有一些特殊的 EpochNumber,被称作 Epoch Tag。他们分别有不同的含义:
-
earliest表示创世 Epoch, 也就是 Epoch 0 -
latest_checkpoint最新的 checkpoint Epoch -
latest_finalized最新被 PoS 链 finalized 的 Epoch,该 Epoch 及其以前的 Epoch 都已达到最终态,状态不会再发生变化 -
latest_confirmed最新被 PoW 链 confirmed 的 Epoch,该 Epoch 及其以前的 Epoch 都已被确认, 状态大概率不会发生变化,除非遭受到极端的 51% 算力攻击 -
latest_state最新被执行的 Epoch, 大部分 RPC 方法的 epochNumber 默认值为该 tag -
latest_mined最新被打包产生的 Epoch。
Conflux 有一个延迟执行机制,区块被打包之后,不会立刻执行,需要延迟 5 个 epoch 才会执行。
通常 latest_state - latest_confirmed 间隔 40-50 Epoch. latest_state - latest_finalized 间隔 400-600 个 Epoch.
Day3 区块大小
Conflux 一个区块的容量为 3000w gas, 意味着一个区块可以包含 1420 多笔普通 CFX 转账交易。
Day4 Transaction 大小
Conflux 网络一笔交易所能指定的最大 gas 为 1500w,也就是区块 gas 容量的一半。 一笔交易 data 的上限为 不到 200k
Day5 Conflux 出块速度,区块时间
Conflux 主网 Core 空间平均一个区块 0.5s,平均一个 Epoch 1s 多。 正常情况下交易从发出到被执行 5-10s。交易确认时间大概为 40-50s
Week2-7.11
Day1 Conflux Core 交易与以太坊 155 交易的区别
Conflux Core 空间的交易,相比于以太坊 155 格式交易多了两个字段:
- storageLimit
- epochHeight
另外构造交易原始数据时,数据的组装方式(RLP 编码)有一些区别,具体参看
最后交易的 status 值所表示的含义也不同,在 Conflux Core 空间,交易或 receipt 的 status 含义如下:
- 0 - 成功
- 1 - 失败
- 2 or null - 交易未执行或被跳过
Day2 Conflux Core 空间地址的类型
Conflux 空间地址是区分类型的,一共有三种:
- user - 普通用户地址
- contract - 合约地址
- builtin - 内置合约地址
- null - 无效地址
base32 verbose 格式的地址一般使用大写字母表示,最重要的是包含地址类型:
CFX:TYPE.USER:AATD0WZV4F7F6J33KH5E182Z4NSCSP59VYE32H4YZ6
具体参看 CIP-37
Day3 Gas Explained
什么是 Gas,他的作用是什么 https://ethgas.io/cn/index.html
Day4 Conflux Gas 详解
Day5 Web3 图书馆
Library of web3 是 Alex Phan 整理的 Web3 相关概念介绍,而且内容按分类进行了划分,方便查看。
Week3-7.18
Day1 - Java-solidity数据类型转换
java-conflux-sdk继承于web3j. 当需要做与合约有关的操作时, 需要将java中的数据类型转为solidity合约中的数据类型. 这里的数据类型的对应关系可以查看: https://github.com/web3j/web3j/blob/master/abi/src/main/java/org/web3j/abi/datatypes/AbiTypes.java#:~:text=public%20static%20Class%3C%3F%20extends%20Type%3E%20getType(String%20type%2C%20boolean%20primitives)
Day2 - Java-conflux-sdk hexstring与byte[]的转换
java-conflux-sdk中在调用call方法时会涉及到hexstring和byte[]的转换。 web3j为我们提供了一个方便的Numeric类来帮助我们实现转换功能。具体的可见https://github.com/web3j/web3j/blob/master/utils/src/main/java/org/web3j/utils/Numeric.java#:~:text=public%20final%20class%20Numeric
示例代码:
        String hexstring = "xxxxxx"; //hexstring
        byte[] test = Numeric.hexStringToByteArray(hexstring);

        String tmp = Numeric.toHexString(test);
Day3 - account.call与client.call的区别
java-conflux-sdk中在通过client调用call方法去读取合约的某个方法,并返回合约的返回值时不会改变合约状态,账户的nonce不会增加。在通过account.call方法去调用合约时,会带来合约状态的改变。
Day4 - 调用sdk时的rpc_url
在用sdk创建client时,需要用到rpc_url。目前rpc_url的汇总如下:
| URL | 场景 | 备注 |
|---|---|---|
| http://127.0.0.1:12539 | 本地节点 | port在toml文件里可以修改 |
| https://test.confluxrpc.com | 香港测试网节点 | |
| https://main.confluxrpc.com | 香港主网节点 | |
| https://test.confluxrpc.org | 美东测试网节点 | |
| https://main.confluxrpc.org | 美东主网节点 |
Day5 - pos节点的注册
conflux目前支持了pos共识,调用pos内置合约需要将本地节点注册为pos节点。java-conflux-sdk提供了相应的内置合约接口去调用内置合约中的注册方法,只需要用户提供相应的raw data. raw data的获取可见:
https://wiki.conflux123.xyz/link/32#bkmrk-%E6%9C%89%E4%B8%80%E4%B8%AA%E6%AD%A3%E5%9C%A8%E8%BF%90%E8%A1%8C%E7%9A%84pos%E6%9C%AC%E5%9C%B0%E8%8A%82%E7%82%B9-%E5%9C%A8%E6%9C%AC%E5%9C%B0%E8%B0%83
Week4 - 7.25
Day1 - PoW 链中区块的确认
攻击者利用算力攻击网络时,可能使 Conflux 的 PoW 链中的 pivot 区块发生变更,进而导致已上链区块中交易的顺序与执行结果发生改变。我们可以通过RPC cfx_getConfirmationRiskByHash 获知持有全网 15% 算力的攻击者对指定区块发起攻击的成功概率。当该值小于 1e-8,即 0.000001% 时,该区块可被视作已确认。区块从上链到确认一般需要40-50秒。
广为人知的比特币的确认时间为6个区块(1个小时)。这意味着持有全网10%算力的攻击者对6个区块之前的区块发起攻击的成功概率为0.1%。
// Request
curl -X POST --data '{"jsonrpc":"2.0","method":"cfx_getConfirmationRiskByHash","params":["0x3912275cf09f8982a69735a876c14584dae95078762090c5d32fdf0dbec0647c"],"id":1}' -H "Content-Type: application/json" localhost:12539

// fix64 格式的返回值,使用该值除以2**256-1可以得到概率为1e-8
{
  "jsonrpc": "2.0",
  "result": "0x2af31dc4611873bf3f70834acdae9f0f4f534f5d60585a5f1c1a3ced1b",
  "id": 1
}
Day2 - 进行重要交易时的区块确认方法
一般情况下,RPC cfx_getConfirmationRiskByHash 的返回值足以满足日常交易的安全性需求。但在特定情况下,例如在发送某些重要交易时,我们可能有更高级别的安全需求,这时可以借助 PoS 链为 PoW 链提供的 Finality(最终性)来确认交易。简单来说,PoS 链会指定 PoW 链中的 pivot 区块,在这之后,即使 51% 攻击者尝试逆转这个区块,也不会被 PoW 节点认可。
通过RPC cfx_getStatus 可以得到当前的节点状态,其中的 latestFinalized 字段就包括当前已被 PoS 链确认的最新 Epoch。通过比较该值与区块的 Epoch,就能知道区块是否已被最终确认。
这种确认方式要更加安全,但同时也会更加耗时。从区块上链到确认需要花费400秒左右。可以在Conflux Scan中查看最新状态到 PoS 最终确认状态的间隔。
// Request
curl -X POST --data '{"jsonrpc":"2.0","method":"cfx_getStatus","id":1}' -H "Content-Type: application/json" localhost:12539

// Result
{
  "jsonrpc": "2.0",
  "result": {
    "bestHash": "0x7bbb518ec0b8671a60e9c98619137b0d52522a9ef9490c9b4c23c30f178312f8",
    "chainId": "0x405",
    "ethereumSpaceChainId": "0x406",
    "networkId": "0x405",
    "epochNumber": "0x2fa1a24",
    "blockNumber": "0x70a7fda",
    "pendingTxNumber": "0x83b",
    "latestCheckpoint": "0x2f91bc0",
    "latestConfirmed": "0x2fa19e1",
    "latestState": "0x2fa1a20",
    "latestFinalized": "0x2fa1854" // 已被 PoS 链确认的最新 Epoch
  },
  "id": 1
}
Day3 - 使用内置合约在链上读取 EpochNumber 等信息
在链下我们可以借助SDK提供的接口或直接通过RPC cfx_getStatus 获取 EpochNumber 等信息。在链上的合约中,则可以借助内置合约ConfluxContext来获取相关信息。合约可以借助ConfluxContext提供的epochNumber(), posHeight(), finalizedEpochNumber() 函数获取当前的区块链状态。
ConfluxContext的地址为CFX:TYPE.BUILTIN:AAEJUAAAAAAAAAAAAAAAAAAAAAAAAAAAAU5XA6TK73 / CFXTEST:TYPE.BUILTIN:AAEJUAAAAAAAAAAAAAAAAAAAAAAAAAAAAUV2XPKD3X。包含 abi 的 metadata 文件可以在这里获取。
pragma solidity >=0.4.15;

contract ConfluxContext {
    /*** Query Functions ***/
    /**
     * @dev get the current epoch number
     * @return the current epoch number
     */
    function epochNumber() public view returns (uint256) {}
    /**
     * @dev get the height of the referred PoS block in the last epoch
`    * @return the current PoS block height
     */
    function posHeight() public view returns (uint256) {}
    /**
     * @dev get the epoch number of the finalized pivot block.
     * @return the finalized epoch number
     */
    function finalizedEpochNumber() public view returns (uint256) {}
}
Day4 - 估算gas消耗时的 gasUsed 与 gasLimit
通过SDK或RPC cfx_estimateGasAndCollateral 估算交易gas消耗时,得到的返回值 estimate 中包括 estimate.gasUsed 与 estimate.gasLimit 字段。其中 estimate.gasUsed 字段代表交易将实际消耗的燃气数,但由于在EVM中每次子函数调用只会传入63/64的gasLimit,直接将交易tx的tx.gasLimit字段直接设置为estimate.gasUsed常常会引发 gas 不足的问题。通常推荐使用 estimate.gasLimit 作为交易的燃气上限 tx.gasLimit ,该值为 estimate.gasUsed 的 4/3 倍。这样一般可以保证 gas 上限设置得足够, gasUsed 以外的燃气消耗也能够全额返还。
在以太坊中,超出
gasUsed的燃气消耗将会全额返还,但Conflux中返还的燃气消耗至多为tx.gasLimit * 1/4。换言之,设置的tx.gasLimit大于gasUsed * 4/3将会导致gasUsed以外的燃气消耗无法被全额返还。更详细的 gas 知识可以参考 Gas 科普。
// Request
curl -X POST --data '{"method":"cfx_estimateGasAndCollateral","id":1,"jsonrpc":"2.0","params":[{"from":"cfx:type.user:aarc9abycue0hhzgyrr53m6cxedgccrmmyybjgh4xg","to":"cfx:type.contract:acc7uawf5ubtnmezvhu9dhc6sghea0403y2dgpyfjp","data":"0x","gasPrice":"0x2540be400","nonce":"0x0"}]}' -H "Content-Type: application/json" localhost:12539

// Result
{
  "jsonrpc": "2.0",
  "result": {
    "gasLimit": "0x6d60", // 21000 * 4/3
    "gasUsed": "0x5208", // 21000
    "storageCollateralized": "0x80"
  },
  "id": 1
}
Day5 - 交易中的 EpochHeight 参数
Conflux中的交易中需要指定EpochHeight参数。当 -100000 < currentEpochNumber - tx.epochHeight < 100000 时交易才会被执行。一般将交易的EpochHeight设置为当前的EpochNumber即可。如果交易对执行的时间点比较敏感,也可以通过设置更小的EpochNumber来避免交易被过晚执行。
产生 100000 个 Epoch 需要 100000 秒左右,约 28 个小时
Week5 - 8.1
Day1
Conflux Core Space 地址格式有哪些?
Conflux Core Space 地址格式有哪些?
Conflux Core Space 地址格式有两种
- Hex格式, 与以太坊格式类似,不同的是用户地址首字符置为1,合约地址首字符置为8; 例:
0x1defad05b632ba2cef7ea20731021657e20a7596 - Base32格式,对Hex格式地址进行 base32 编码且附加地址属性描述; 例:
CFX:TYPE.USER:AAKPBX01FZM1XP89CB7URF6YVYXH3GGX5E9HZ07B38
参考
Day2
Base32格式由哪几部分组成,为什么推荐使用Base32格式?
Base32 地址格式由哪几部分组成
Base32 编码是什么
Base32 编码指将 每5bit数值 编码为一个Base32字符;如将`0b00000"(对应16进制表示"0x00")编码为"a"
所有编码对应关系为 0x00~0x1f <==> abcdefghjkmnprstuvwxyz0123456789
Base32 格式地址包含哪几部分
- Network-prefix : 标识网络类型,cfx表示主网,cfxtest表示测试网
- Address type : 地址类型
TYPE.XXX,包括用户地址、合约地址、内置合约地址、未知地址类型 - Payload : 对 Hex格式地址前面加一个全零字节的值进行base32编码的结果
- Checksum : 校验位,尾部8个字符,用于校验地址的正确性
示例如下:
CFX:TYPE.USER:AAKPBX01FZM1XP89CB7URF6YVYXH3GGX5E9HZ07B38
|   |        |                                  |--- Checksum
|   |        |--- Payload
|   |--- 地址类型
|--- 网络标识
Base32 地址格式比Hex地址格式增加了网络类型和地址类型信息,增强了辨识度
Base32 格式地址与 Hex 格式地址可以互相转换
为什么推荐使用 Base32格式?
由于Hex格式的地址与以太坊地址首字符不同可能导致在用户转账时误将以太坊格式当做conflux地址使用,导致转账或跨链时将代币转到错误的地址造成财产损失,所以推荐使用Base32地址,而同样为了避免该问题,官方主流钱包Fluent及大多社区钱包也不支持使用Hex地址格式转账。
参考
Day3
eSpace 地址
Conflux 从 v2.0 开始引入了一个全新的网络空间 eSpace (原空间被命名为 Core Space),该空间实现了以太坊的完全兼容,允许用户和开发者,直接使用以太坊生态的钱包和工具跟该空间交互。即eSpace的地址生成方式、地址格式、以及助记词derive path都是与以太坊完全一致的。
所以可以使用 Metamask 作为 eSpace 的钱包。
地址生成规则:

详情参见
Day4
Core Space 账号在 eSpace 的映射地址
Core Space 账号在 eSpace 的映射地址属于eSpace的用户地址类型
计算规则如下
- 将 Core Space 的 base32 地址 decode 为 bytes 类型
- 对 bytes 进行 keccak 哈希计算
- 取哈希结果的后 20 bytes,转换为 hex 格式
映射地址是为了两个空间资产跨链设计的概念,使用内置合约 CrossSpaceCall 可以转移eSpace映射地址资产到指定地址从而实现资产跨链,同时该内置合约也支持调用eSpace合约。
参考
Day5
Core Space 内置合约有哪些
Conflux 引入内置合约用于更好的系统维护和链上治理。现在 Conflux core space 有 6 个内置合约:主网上线时就有AdminControl、SponsorWhitelistControl和Staking合约,在 v2 硬分叉时又增加了 ConfluxContext, PoSRegister, ConfluxContext。 这些函数只能通过CALL或STATICCALL操作调用。使用操作 CALLCODE 或 DELEGATECALL 与内部合约交互会触发错误。
他们的Hex格式地址为:
- AdminControl: 0x0888000000000000000000000000000000000000
- SponsorWhitelistControl: 0x0888000000000000000000000000000000000001
- Staking: 0x0888000000000000000000000000000000000002
- ConfluxContext: 0x0888000000000000000000000000000000000004
- PoSRegister: 0x0888000000000000000000000000000000000005
- CrossSpaceCall: 0x0888000000000000000000000000000000000006
参考
Week6- PoS
Day1 如何参与 PoS?
参与 Conflux PoS 目前可以获得 15% 左右的年化收益,参与方式有两种:
- 自己运行一个 Conflux 节点,通过 Staking 内置合约将 CFX 质押,然后通过 PoSRegister 内置合约参与进 PoS
- 直接选择一个 PoS Pool,将 CFX 质押进矿池中,可以随时解质押,提取收益。
第一种方式自主,可控,第二种方式简单方便。
Day2 PoS 常见参数
- PoS 出块时间平均为 1 分钟
- PoS 节点地址长度为 256 比特,跟交易或区块 hash 比较像
- PoS 一票 = 1000 CFX,所以参与 PoS CFX 数量只能是 1000 的整数倍
- 参与 PoS 会有一个锁定期,从 Stake 到 PoS 中到取出,最短需要 14 天
- 一届 PoS 委员会最多有 300 票
- 节点参选进 PoS 委员后将会持续 6 个小时
Day3 PoS 对 PoW 区块的 finalized
PoS 链每产生一个区块中都会包含对 PoW 区块的确认信息 pivotDecision 其中包含所确认的 PoW pivot chain 的高度和 hash 信息,被 PoS 确认后的区块将不会再被 Revert。
PoW 区块中也有一个字段 posReference 表示 PoW 对 PoS 的引用。
如何获取 PoW 最新的 finalized 高度(区块号):
- 访问 cfx_getStatus 返回数据的
latestFinalized即为最新 finalized 高度 - 访问 cfx_epochNumber 并传参
latest_finalized返回的 number 也是最新的 finalized 高度
Day4 ForceRetire
PoS 节点需要保证自身的稳定性,持续参与 PoS 机制,越稳定的节点,奖励越高。如果一个节点参选为 PoS 委员会,但在任内期间超过 1小时没有正常参与 PoS 出块投票,那么该节点将会被强制退出。该节点的所有投票将会自动变为 unlock 状态。节点强制退休状态会持续 7 天。unlock 的票 会持续 7 - 14 天,强制退休期间,如果进行质押操作,票也会自动 unlock 直到满14 天才能 withdraw。
在下一次 hardfork 升级中(2.1.0)将会调整节点的 forceRetire 参数,从原来的一小时,改为三小时。即一个委员会节点不工作超过三小时后才会强制退休。此调整目的是为了给 PoS 运维人员留更多的处理时间。增加节点的鲁棒性
Day5 PoS 收益
参与 Conflux PoS 不仅能帮助提高 Conflux 网络的安全性,还能获取一定的收益。目前全网质押量为 1.3 亿,理论年化收益为 16.6%。
收益计算参数包含以下三个:
- 基础收益率 4%
- 总流通量(totalCirculate):发行总量-四年锁-两年锁-销毁量(0地址余额)
- PoS 当前质押量(totalStake)

PoS 收益每小时发放一次,直接发放至 PoS 节点账号绑定的 PoW 地址中,如果是通过 PoS 矿池参与,每小时会计算一次收益,随时可领取。
Week7-8.15
Day1 CIP23与EIP712的异同
在用钱包为结构化的数据签名时,用户看到的只是一串处理后的hex字符串,无法得知具体签名的内容,这对信息、财产等安全造成了极大的威胁。为了解决该问题,以太坊引入了EIP712。与此相对的,conflux引入了CIP23来作为解决方案。CIP23与EIP712的差异总结如下:
-
当签署一条非结构化的message时,conflux为message增加前缀
\x19Conflux Signed Message:\n而不是以太坊中的\x19Ethereum Signed Message:\n -
将
EIP712domain重命名为CIP23domain -
在CIP23domain中,
chainId字段必须包含在其中。否则应该拒绝签署该结构化的数据。
Day2 如何基于CIP23签署消息
-
当签名消息为非结构化消息时,为:
encode(message : 𝔹⁸ⁿ) = "\x19Conflux Signed Message:\n" ‖ len(message) ‖ message where len(message) is the non-zero-padded ascii-decimal encoding of the number of bytes in message.
-
当签名消息为结构化消息时,为:
encode(domainSeparator : 𝔹²⁵⁶, message : 𝕊) = "\x19\x01" ‖ domainSeparator ‖ hashStruct(message) where domainSeparator and hashStruct(message) are defined below.
具体的,conflux-sdk为我们提供了相应的sdk简化签署消息的过程。以java-sdk为例:
package conflux.web3j.crypto;

import org.junit.jupiter.api.Test;
import org.web3j.utils.Numeric;

import java.io.IOException;

import static org.junit.jupiter.api.Assertions.assertEquals;

public class SignDataTests {

    //cfx_signTypedData_v4
    @Test
    public void testSignValidStructure() throws IOException {
        StructuredDataTests t = new StructuredDataTests();

      //获取TypedData
        String msg = t.getResource(
                "build/resources/test/"
                        + "structured_data_json_files/ValidStructuredData.json");
      //根据msg创建编码器
        StructuredDataEncoder dataEncoder = new StructuredDataEncoder(msg);
      //将数据进行编码后得到msghash,再进行签名
        org.web3j.crypto.Sign.SignatureData sign = org.web3j.crypto.Sign.signMessage(dataEncoder.hashStructuredData(), SampleKeys.KEY_PAIR, false);
        assertEquals(
                "0x371ef48d63082d3875fee13b392c5b6a7449aa638921cb9f3d419f5b6a817ba754d085965fb3a041c3b178d3ae3798ea322ae74cb687dd699b5f6045c7fe47a91c",
                Numeric.toHexString(sign.getR()) + Numeric.toHexStringNoPrefix(sign.getS()) + Numeric.toHexStringNoPrefix(sign.getV()));
    }

    //personal_sign
    @Test
    public void testSignAnyMessage() throws IOException {
        String message = "v0G9u7huK4mJb2K1";
      //将msg加上前缀后进行编码后得到msghash,再进行签名
        org.web3j.crypto.Sign.SignatureData sign = Sign.signPrefixedMessage(message.getBytes(), SampleKeys.KEY_PAIR);
        assertEquals(
                "0xbb0ee8492623f2ef6ed461ea638f8b5060b191a1c8830c93d84245f3fb27e20a755e24ff60fe76482dd4377a0aef036937ef88537b2d0fdd834a54e76ecafadc1c",
                Numeric.toHexString(sign.getR()) + Numeric.toHexStringNoPrefix(sign.getS()) + Numeric.toHexStringNoPrefix(sign.getV()));
    }
}
Day3 如何基于cip23去验证签名的真伪
基于cip23签署的消息有两种验证方式,分别是基于sdk与合约验签。
以java-sdk为例,基于sdk的验签方法为
package conflux.web3j.crypto;

import org.junit.jupiter.api.Test;
import org.web3j.crypto.*;
import org.web3j.crypto.Sign;
import org.web3j.utils.Numeric;

import java.io.IOException;
import java.util.Arrays;

import static org.junit.jupiter.api.Assertions.assertEquals;

public class ECRecoverTest {
    private String getAddress() {
        return Numeric.prependHexPrefix(Keys.getAddress(getPubKey()));
    }

    private String getPubKey() {
        return SampleKeys.KEY_PAIR.getPublicKey().toString();
    }


    @Test
    public void testSignAndRecoverMessage() {
        String message = "v0G9u7huK4mJb2K1";

        byte[] msgHash = conflux.web3j.crypto.Sign.getConfluxMessageHash(message.getBytes());

        Sign.SignatureData sign = conflux.web3j.crypto.Sign.signPrefixedMessage(message.getBytes(), SampleKeys.KEY_PAIR);
			//根据签名与地址进行recover,得到签名的地址
        String recoverAddress = conflux.web3j.crypto.Sign.recoverSignature(sign, msgHash, getAddress());
        assertEquals(recoverAddress, getAddress());
    }

  //在fluent中进行签名得到签名后,可以参考以下例程来进行recover
    @Test
    public void testRecoverTyped() throws IOException {
        StructuredDataTests t = new StructuredDataTests();
        String msg = t.getResource(
                "build/resources/test/"
                        + "structured_data_json_files/ValidStructuredData.json");
        StructuredDataEncoder dataEncoder = new StructuredDataEncoder(msg);

        //以下的签名可以根据上文中的fluent签名来获取
        String signature =
                "0x371ef48d63082d3875fee13b392c5b6a7449aa638921cb9f3d419f5b6a817ba754d085965fb3a041c3b178d3ae3798ea322ae74cb687dd699b5f6045c7fe47a91c";

      	 //根据签名创建签名实例
        byte[] signatureBytes = Numeric.hexStringToByteArray(signature);
        byte v = signatureBytes[64];
        if (v < 27) {
            v += 27;
        }

        Sign.SignatureData sd =
                new Sign.SignatureData(
                        v,
                        (byte[]) Arrays.copyOfRange(signatureBytes, 0, 32),
                        (byte[]) Arrays.copyOfRange(signatureBytes, 32, 64));
			//getAddress()中的私钥应换为在fluent钱包中的账户私钥
        String recoverAddress = conflux.web3j.crypto.Sign.recoverSignature(sd, dataEncoder.hashStructuredData(), getAddress());
        assertEquals(recoverAddress, getAddress());
    }

  //以下实现与testSignAndRecoverMessage()一样,只是签名方式有区别
    @Test
    public void testSignAndRecoverTyped() throws IOException {
        StructuredDataTests t = new StructuredDataTests();
        String msg = t.getResource(
                "build/resources/test/"
                        + "structured_data_json_files/ValidStructuredData.json");
        StructuredDataEncoder dataEncoder = new StructuredDataEncoder(msg);
        Sign.SignatureData sign = Sign.signMessage(dataEncoder.hashStructuredData(), SampleKeys.KEY_PAIR, false);

        String recoverAddress = conflux.web3j.crypto.Sign.recoverSignature(sign, dataEncoder.hashStructuredData(), getAddress());
        assertEquals(recoverAddress, getAddress());
    }
}
这其中最主要的是recover()函数,我们来看看该函数的实现:
    public static String recoverSignature(SignatureData sd, byte[] data, String address) {
        String addressRecovered = null;

        // Iterate for each possible key to recover
        for (int i = 0; i < 4; i++) {
            BigInteger publicKey =
                    org.web3j.crypto.Sign.recoverFromSignature(
                            (byte) i,
                            new ECDSASignature(
                                    new BigInteger(1, sd.getR()), new BigInteger(1, sd.getS())),
                            data);

            if (publicKey != null) {
                addressRecovered =  Numeric.prependHexPrefix(Keys.getAddress(publicKey.toString()));

                if (addressRecovered.equals(address)) {
                    break;
                }
            }
        }

        return addressRecovered;
    }
以太坊的加密算法中提供了四种签名模式,在四种签名模式下,从签名中去还原公钥,再用公钥去得到地址,与目标地址进行匹配。具体的四种签名模式可参考https://github.com/web3j/web3j/blob/7dea3d99c5bdbfcc03aaeaa8575fb0c9a9a771ab/crypto/src/main/java/org/web3j/crypto/Sign.java#:~:text=public%20static%20BigInteger%20recoverFromSignature(int%20recId%2C%20ECDSASignature%20sig%2C%20byte%5B%5D%20message)%20%7B
对于合约验签,我们需要在合约当中去实现结构化数据类型,具体可见: https://wiki.conflux123.xyz/link/60#bkmrk-%E5%90%88%E7%BA%A6%E9%AA%8C%E7%AD%BE
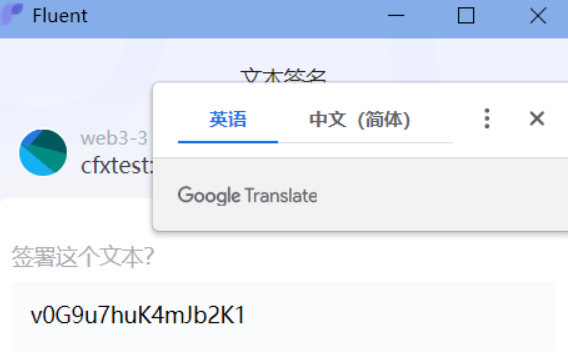
Day4 如何用fluent钱包去签名
java-sdk的test例程中提供了两种方式去签名,一种是未知签名,用sdk签名后再用sdk进行recover,另一种是已知签名。那么如何得到这个已知签名呢?可以用fluent等方式来获得。具体的fluent钱包为我们提供了相当的provider rpc doc。fluent钱包不仅支持cfx下的签名,还支持eth环境下的签名。
为了实现personal_sign方法,我们需要在浏览器的console中输入:
conflux
  .request({
    method: 'personal_sign',
    params: [
 'v0G9u7huK4mJb2K1', '<your_address>']})
此时页面会弹出来自fluent的签名消息
对该消息进行签名后,得到对应的签名。

同样的,为了实现cfx_signTypedData_v4方法,在console中输入
conflux
  .request({
    method: 'cfx_signTypedData_v4',
    params: [
 '<your_address>',
        `{
    "types": {
        "CIP23Domain": [
            {
                "name": "name",
                "type": "string"
            },
            {
                "name": "version",
                "type": "string"
            },
            {
                "name": "chainId",
                "type": "uint256"
            },
            {
                "name": "verifyingContract",
                "type": "address"
            }
        ],
        "Person": [
            {
                "name": "name",
                "type": "string"
            },
            {
                "name": "wallet",
                "type": "address"
            }
        ],
        "Mail": [
            {
                "name": "from",
                "type": "Person"
            },
            {
                "name": "to",
                "type": "Person"
            },
            {
                "name": "contents",
                "type": "string"
            }
        ]
    },
    "primaryType": "Mail",
    "domain": {
        "name": "Ether Mail",
        "version": "1",
        "chainId": 1,
        "verifyingContract": "0xCcCCccccCCCCcCCCCCCcCcCccCcCCCcCcccccccC"
    },
    "message": {
        "from": {
            "name": "Cow",
            "wallet": "0xCD2a3d9F938E13CD947Ec05AbC7FE734Df8DD826"
        },
        "to": {
            "name": "Bob",
            "wallet": "0xbBbBBBBbbBBBbbbBbbBbbbbBBbBbbbbBbBbbBBbB"
        },
        "contents": "Hello, Bob!"
    }
}`]
  })
弹出的消息框中有消息的message字段

在签署后可以得到同样的签名
Day5 目前支持cip23的sdk
目前java-sdk与js-sdk支持cip23,对应的例程分别在java-sdk cip23例程和js-sdk cip23例程
后续go-sdk与python-sdk也会支持上cip23,敬请期待!
Week8-8.21
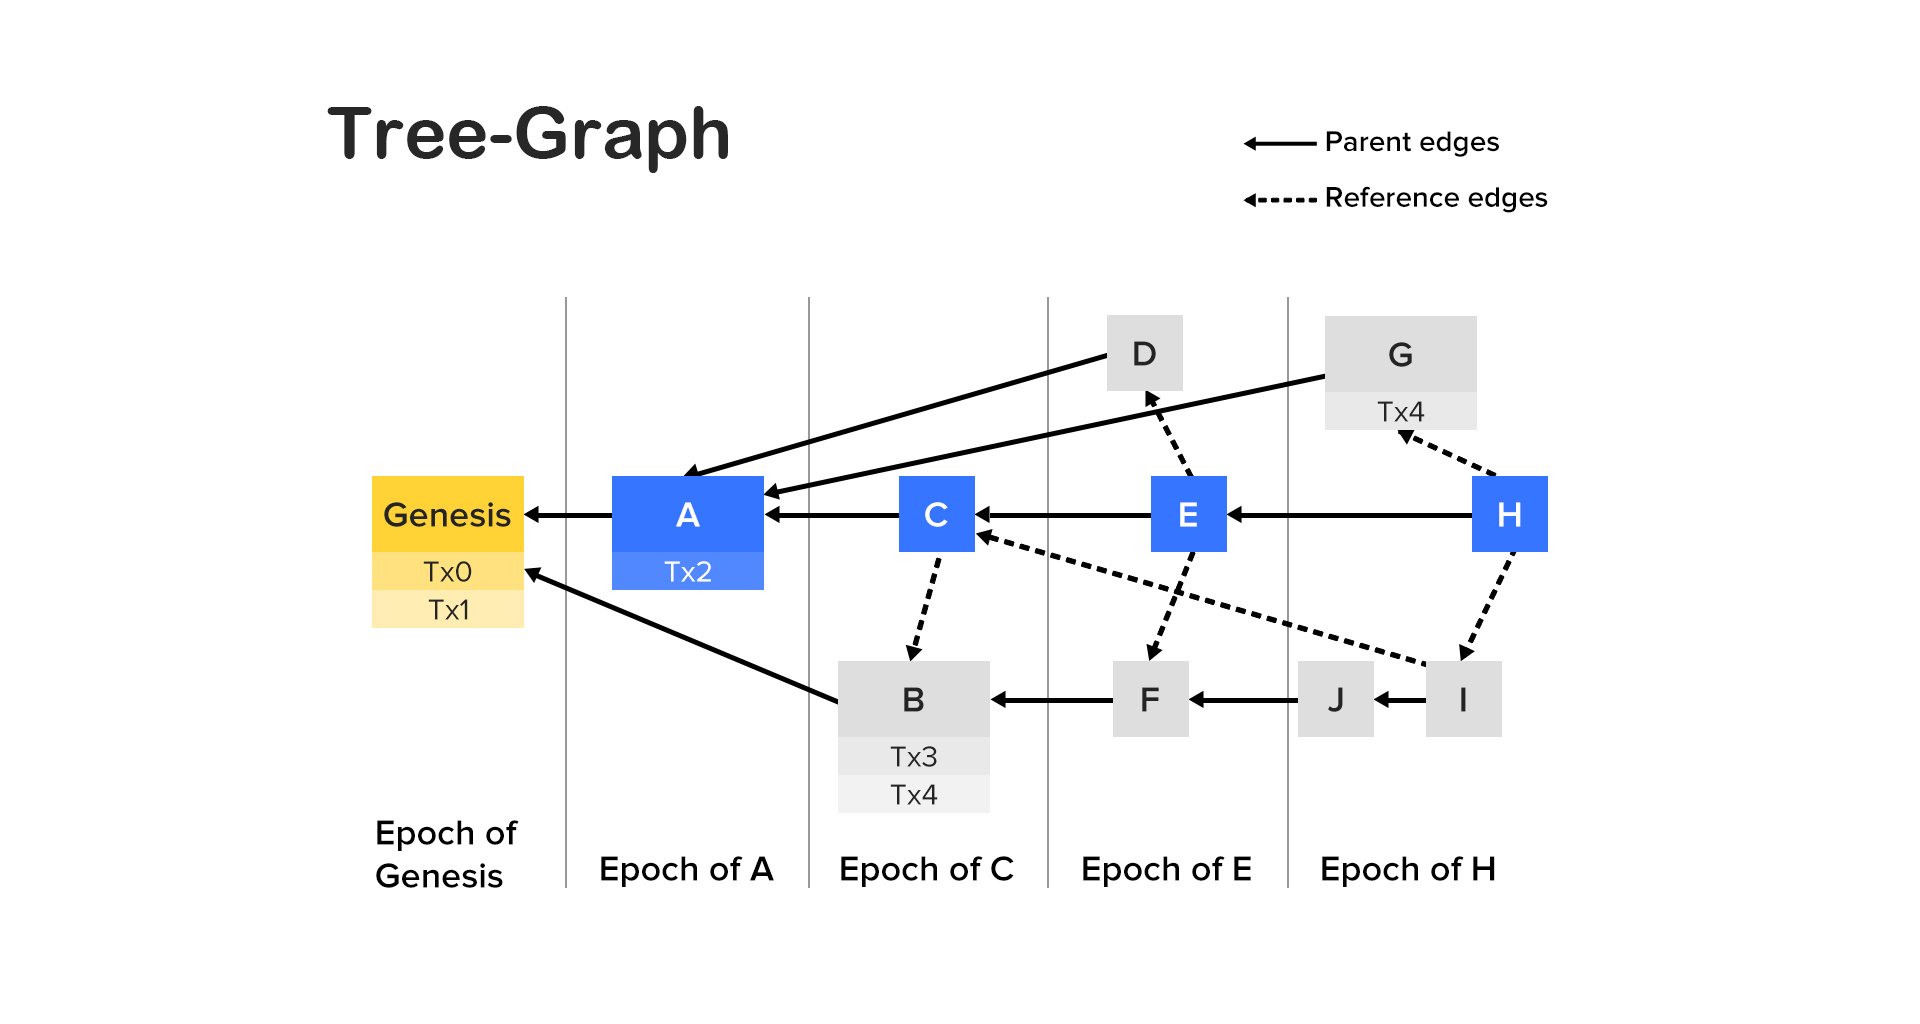
8.22 Epoch Number, Block Number,Height 与 Epoch Height 的区别
Conflux 采用了树图共识,常常会采用 epoch number 与 block number 来标识区块,同时也有着 height 与 epoch height 与区块相关的字段。这些字段的区别如下:
-
Epoch Number(纪元):如图所示,Conflux 会根据共识挑选出蓝色的(pivot)区块,并根据这些区块划分出若干个连续的
epoch,每个epoch中会包含一个或多个区块。例如(1)A、C、E、H 在不同的epoch中,epoch number不同且递增;(2)B、C的epoch number相同。 -
Block Number:一旦
epoch的划分被决定,每个区块会被确定唯一的block number。block number决定了交易的执行顺序。图中的所有区块的block numebr都不相同。
需要注意的是,新上链的区块不稳定,可能发生区块顺序的重组导致
epoch number与block number发生变化。
-
Height(区块高度):
height为区块所包含的字段,等于其父区块的Height+1。蓝色(pivot)区块的height总是和其epoch number相等。图中 C、D、G 区块的Height相同。 -
Epoch Height(目标纪元):
epoch height是交易中发送者所指定的字段,代表着该笔交易被执行时的合法epoch number范围。交易中的 EpochHeight 参数 对这一点进行了更详尽的解释。
8.23 存储抵押机制
在Conflux中引入了存储抵押(Collateral for storage)机制,作为使用存储的定价方式。合约的交互者在占用存储空间时需要锁定一笔资金,作为占用存储空间的抵押物。在相应的存储空间被释放或被他人覆盖前,抵押物都会被锁定,而被锁定的抵押物所产生的相应利息会直接分配给矿工,用于存储空间的维护。
在Conflux网络中,每个存储条目占用空间是64字节,我们称最后向某个存储条目写入的账户称为该存储条目的所有者。而对于每一个存储条目,其所有者会被锁定 1/16 CFX。当其他账户修改了某个存储条目时,存储条目的所有者会改变,原所有者抵押的资金(1/16 CFX)会被解锁,新所有者则会锁定同样的资金。当合约被销毁时,所有空间会被释放,对应的存储抵押也会被全部解锁。
更加细节的解析可以参考Conflux的存储抵押机制。
8.24 代付中存储抵押的更新
Conflux 中的代付机制除了支持 gas 的代付外也支持存储抵押的代付。赞助者可以通过调用代付合约的setSponsorForCollateral(address contractAddr)并发送一笔CFX更新存储抵押代付,新发送的CFX需要大于原有的存储抵押。其后,原赞助者为存储抵押支付的所有CFX(包括已被使用的存储抵押与未被使用的存储抵押)将会被全部返还。
8.25 在内置合约 Staking 中质押 CFX
在 Conflux 中,除了因交易的存储开销导致CFX被抵押外,账户还可以与内置合约 Staking 交互主动质押 CFX。质押的 CFX 目前有两种用途:
- 用于参与POS链。参考如何参与POS?
- 用于参与治理投票,包括治理与即将上线的CIP-94 On-chain DAO Vote for Chain Parameters 。
8.26 与 Pivot 区块相关的 RPC 方法
Pivot 区块(下图中蓝色的区块)十分重要,决定了 Conflux 中区块(中交易)实际的执行顺序。Conflux 的 RPC 也提供了数个与 Pivot 区块相关的方法:
-
cfx_getStatus与cfx_getBestBlockHash。cfx_getStatus获得的bestHash字段代表了在最新一个epoch中Pivot 区块的哈希值。cfx_getBestBlockHash所获取的也是该值。
// getStatus
{
  "jsonrpc": "2.0",
  "result": {
    "bestHash": "0xe4bf02ad95ad5452c7676d3dfc2e57fde2a70806c2e68231c58c77cdda5b7c6c",
    "chainId": "0x1",
    "networkId": "0x1",
    "blockNumber": "0x1a80325",
    "epochNumber": "0xaf28ab",
    "latestCheckpoint": "0xada520",
    "latestConfirmed": "0xaf2885",
    "latestState": "0xaf28a7",
    "latestFinalized": "0x2a420c",
    "ethereumSpaceChainId": "0x22b9",
    "pendingTxNumber": "0x0"
  },
  "id": 1
}
-
cfx_getBlocksByEpoch。该 RPC 会返回某一个 Epoch 下的所有区块,并按照 blockNumber 排序。换言之,该返回值中的最后一个区块为 Pivot 区块.
// Result
{
    "jsonrpc": "2.0",
    "result": [
        "0x618e813ed93f1020bab13a1ab77e1550da6c89d9c69de837033512e91ac46bd0",
        "0x0f6ac81dcbc612e72e0019681bcec32254a34bd29a6bbab91e5e8dc37ecb64d5",
        "0xad3238c00456adfbf847d251b004c1e306fe637227bb1b9917d77bd5b207af68",
        "0x0f92c2e796be7b016d8b74c6c270fb1851e47fabaca3e464d407544286d6cd34",
        "0x5bcc2b8d2493797fcadf7b80228ef5b713eb9ff65f7cdd86562db629d0caf721",
        "0x7fcdc6fff506b19a2bd72cd3430310915f19a59b046759bb790ba4eeb95e9956",
        "0xf4f33ed08e1c625f4dde608eeb92991d77fff26122bab28a6b3a2037511dcc83",
        "0xa3762adc7f066d5cb62c683c2655be3bc3405ff1397f77d2e1dbeff2d8522e00",
        "0xba7588476a5ec7e0ade00f060180cadb7430fd1be48940414baac48c0d39556d",
        "0xe4dc4541d07118b598b2ec67bbdaa219eb1d649471fe7b5667a0001d83b1e9b6",
        "0x93a15564544c57d6cb68dbdf60133b318a94439e1f0a9ccb331b0f5a0aaf8049" // pivot
    ],
    "id": 1
}
-
cfx_getBlockByHashWithPivotAssumption。该 RPC 与常用的cfx_getBlockByHash类似,不同点在于,该 RPC 需要传入三个参数:(1)blockHash(2)assumedPivotHash(3)epochNumber。当后面两个参数与blockHash相匹配时,该RPC才会返回 blockHash 对应的区块信息,否则会返回错误。
Week9 - 8.29
Day1 conflux 合约工具库
openzepplin是以太坊开发最重要的合约库, conflux-contracts 则是为了方便conflux开发者而封装的合约集合,主要包含
Day2 合约中如何判断是否为cfx链
conflux 链上的erc1820地址与以太坊不同, 以太坊为0x1820a4B7618BdE71Dce8cdc73aAB6C95905faD24, conflux core space为0x88887eD889e776bCBe2f0f9932EcFaBcDfCd1820
,通过判断该特征即可,conflux-contracts提供了该实现
Day3 如何通过合约一次访问多个合约方法
dapp经常需要同时获取很多合约状态,如果每次读取合约都发送一次rpc请求,则需要并发大量请求,这样容易对服务区造成很大压力导致rpc node服务器性能下降或者被限流。而使用multicall进行则可以一次rpc请求访问多个合约方法,从而避免该问题。
multicall 提供了一系列方法方便一次访问多个合约方法,实现原理为在合约方法中批量 static call, 使用该方法需要我们事先根据要访问的合约方法abi编码好数据。
如要获取地址cfxtest:aanpu16mtgc7dke5xhuktyfyef8f00pz8a2z5mc14g和cfxtest:aaskvgxcfej371g4ecepx9an78ngrke5ay9f8jtbgg的 usdt 余额
- 编码data
-
balanceOf("cfxtest:aanpu16mtgc7dke5xhuktyfyef8f00pz8a2z5mc14g")编码后的data为0x70a0823100000000000000000000000016c85f8a7985d1a49b99e097d0b4217c5b5995f0 -
balanceOf("cfxtest:aaskvgxcfej371g4ecepx9an78ngrke5ay9f8jtbgg")编码后的data为0x70a082310000000000000000000000001c989a6229119edcda2088c9fc0bef9666a49b05
-
- 调用
muticall合约的函数function aggregate(address target, bytes[] memory calldatas) public view virtual returns (bytes[] memory);
results = muticall.aggregate(usdt_address,["0x70a0823100000000000000000000000016c85f8a7985d1a49b99e097d0b4217c5b5995f0","0x70a082310000000000000000000000001c989a6229119edcda2088c9fc0bef9666a49b05"])
- 然后对返回结果进行abi解码
ABI编解码的方法各个SDK都有提供,请参考具体使用的sdk
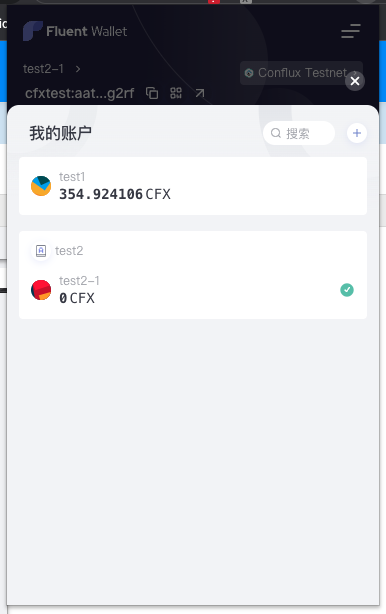
Day4 Fluent小知识 - Fluent 如何导入多套助记词
1. Fluent 如何导入多套助记词
当我们想要分场景使用不同助记词管理私钥组以隔离风险时,是不是苦于找不到这样的钱包?其实Fluent已经提供了这样的功能,那怎么使用呢?👇
点击左上角钱包名称
在弹出框中点击右上角"+"
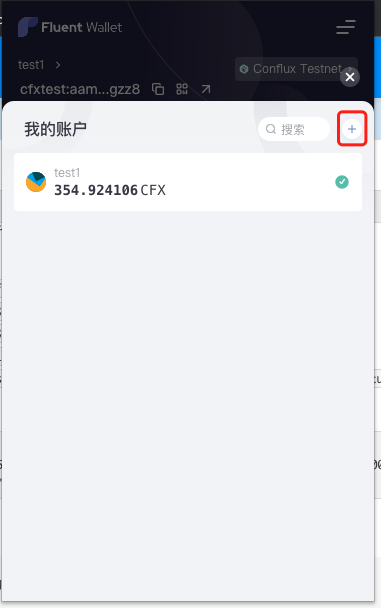
即可再次导入一套助记词
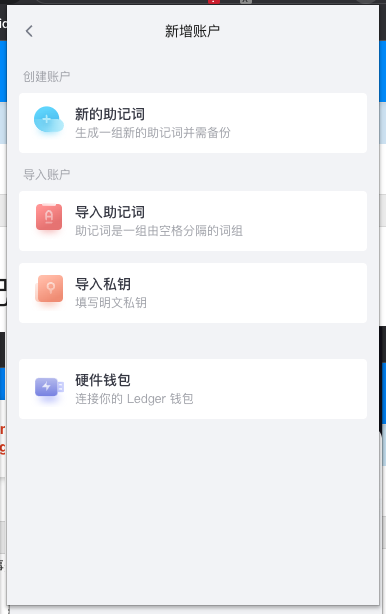

现在可以看到新导入的助记词了
Fluent 同时也支持多个网络,当前支持以太坊跟Conflux,以后还会陆续增加其他链的支持。
Day5 Fluent冷知识
- Fluent 相同助记词可以同时在conflux和ethereum使用,但是由助记词生成的钱包在同样的序号下使用的derive path不同,所以生成的私钥也是不一样的。 所以不要混用。
- Conflux 下私钥生成的 dervie path 为
m’/44’/60’/0’/0 - Ethereum 下私钥生成的 dervie path 为
m’/44’/503’/0’/0
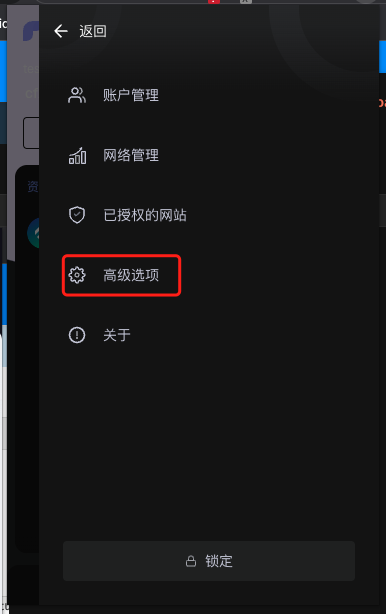
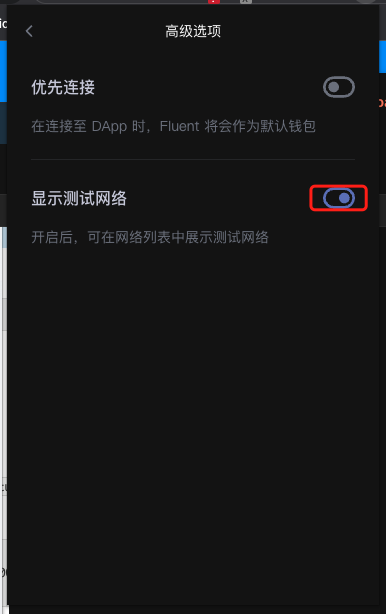
- Fluent 没看到测试网络,Fluent是不支持测试网么?
其实Fluent是支持测试网的,只是由于普通用户通常不需要使用测试网,所以默认隐藏了起来,通过高级选项就可以打开测试网了。
Week10-NFT 标准
近两年NFT,元宇宙发展如火如荼,那么到底什么是NFT ? NFT 又称非同质化代币,核心特性是每个代币都是独一无二的,跟其他代币是不相同的。在以太坊标准里 NFT 是通过一系列 EIP 来定义的,本周来带领大家了解一下主流的标准
Day1 - ERC721
ERC-721 是最早的 NFT 标准, 早期 CryptoKitties 等项目均采用该标准。与 20 代币最大的区别是:每个 token 都有唯一的 ID,且 token 不可进行拆分。
其核心接口如下:
interface ERC721 /* is ERC165 */ {
    // events
    event Transfer(address indexed _from, address indexed _to, uint256 indexed _tokenId);
    event Approval(address indexed _owner, address indexed _approved, uint256 indexed _tokenId);
    event ApprovalForAll(address indexed _owner, address indexed _operator, bool _approved);

    function balanceOf(address _owner) external view returns (uint256);
	function ownerOf(uint256 _tokenId) external view returns (address);
	function safeTransferFrom(address _from, address _to, uint256 _tokenId, bytes data) external payable;
	function safeTransferFrom(address _from, address _to, uint256 _tokenId) external payable;
	function transferFrom(address _from, address _to, uint256 _tokenId) external payable;
	function approve(address _approved, uint256 _tokenId) external payable;
	function setApprovalForAll(address _operator, bool _approved) external;
	function getApproved(uint256 _tokenId) external view returns (address);
	function isApprovedForAll(address _owner, address _operator) external view returns (bool);
}
写接口包含:
- transferFrom
- safeTransferFrom
- approve
- setApprovalForAll
读接口则包含:
- balanceOf
- ownerOf
- getApproved
- isApprovedForAll
另外 ERC721 还有一些常用的扩展,包括:
- metadata 扩展
- 枚举扩展
- 可暂停扩展
- 可销毁扩展
Day2 ERC1155
ERC1155 是另外一个采用较多的标准, 该标准 与 ERC20 的区别是,在一个合约中可以同时包含多个 token,与 ERC721 的区别在于,每个 tokenId 的数量,可以不止有一个。
另外 ERC1155 支持批量操作,比如批量转账,批量mint,批量查询余额
interface ERC1155 /* is ERC165 */ {
    event TransferSingle(address indexed _operator, address indexed _from, address indexed _to, uint256 _id, uint256 _value);
    event TransferBatch(address indexed _operator, address indexed _from, address indexed _to, uint256[] _ids, uint256[] _values);
    event ApprovalForAll(address indexed _owner, address indexed _operator, bool _approved);
    event URI(string _value, uint256 indexed _id);

    function safeTransferFrom(address _from, address _to, uint256 _id, uint256 _value, bytes calldata _data) external;
    function safeBatchTransferFrom(address _from, address _to, uint256[] calldata _ids, uint256[] calldata _values, bytes calldata _data) external;
    function balanceOf(address _owner, uint256 _id) external view returns (uint256);
    function balanceOfBatch(address[] calldata _owners, uint256[] calldata _ids) external view returns (uint256[] memory);
    function setApprovalForAll(address _operator, bool _approved) external;
    function isApprovedForAll(address _owner, address _operator) external view returns (bool);
}
Day3 ERC2981
ERC2981 主要用于实现 NFT 版税功能,可以实现在 NFT 每次转移时,支付一定收益给 NFT 的创造者或者版权所有者。该标准适用于 ERC721 或 ERC1155 token.
该标准主要包含一个方法 royaltyInfo 用于确认某 tokenId 在某售价情况下,应该给谁支付多少的版税:
interface IERC2981 is IERC165 {
    function royaltyInfo(
        uint256 _tokenId,
        uint256 _salePrice
    ) external view returns (
        address receiver,
        uint256 royaltyAmount
    );
}
Day4 SBT 灵魂绑定代币
SBT 又称灵魂绑定 Token,简单来说可以理解为 不可转移 NFT。其应用场景包含:身份认证,投票, KYC 等
目前能够支持 SBT 的 EIP 提案,我们已经看到的有 EIP-4973、EIP-5114、ERC721S 等,还有 Solv Protocol 提出的 EIP-3525。
Day5 ERC3525 半匀质化通证代币
这是一个通用标准,适用面非常广阔。它可以把多个相似但并不相同的通证识别为“同类”,然后允许同类之间进行相互转账等特殊操作。从效果上,相当于同类之间可以进行合并、拆分、碎片化等数学操作
直截了当地解释 ERC-3525 与 ERC-1155 的差别 - 孟岩
概览
除此之外 NFT 相关的 标准还有很多,NFT 协议全览:标准协议、流动性协议和跨链协议 对他们进行了全面的梳理和总结
Week11-9.13
内置合约
在conflux的v2版本的分叉后,增加了ConfluxContext, PoSRegister, CrossSpaceCall, ParamsControl四个内置合约,那么这四个内置合约实现了什么功能呢?可以参见本周的devtips
Day1 ConfluxContext
该内置合约提供了三个方法去查询conflux相关的信息,包括当前的epochNumber, posHeight和最终确认的pivot块。
该合约的地址为0x0888000000000000000000000000000000000004.
该合约的abi为:
// SPDX-License-Identifier: MIT
pragma solidity >=0.4.15;

interface ConfluxContext {
    /*** Query Functions ***/
    /**
     * @dev get the current epoch number
     * @return the current epoch number
     */
    function epochNumber() external view returns (uint256);
    /**
     * @dev get the height of the referred PoS block in the last epoch
`    * @return the current PoS block height
     */
    function posHeight() external view returns (uint256);
    /**
     * @dev get the epoch number of the finalized pivot block.
     * @return the finalized epoch number
     */
    function finalizedEpochNumber() external view returns (uint256);
}
那么如何去调用该合约呢?以java sdk为例:
    public static void test(String contractAddr, String caller) throws Exception {
        Cfx cfx = Cfx.create("https://test.confluxrpc.com");
        Account acc = Account.create(cfx, caller);
        Address address = new Address(contractAddr);
        String hash = acc.call(address, "epochNumber");
        cfx.waitForReceipt(hash);
        Optional<Receipt> receipt = cfx.getTransactionReceipt(hash).sendAndGet();
        if (receipt.isPresent()) {
				.......
        } else {
           .......
        }

    }
Day2 PoSRegister
PoSRegister合约提供了一系列方法去和PoS链进行交互
该合约的方法介绍如下:
-
register- 将本地节点注册为pos链上的一个pos节点 -
increaseStake- 提高pos权重 -
retire- 降低pos权重 -
getVotes- 查询一个账户的vote信息 -
identifierToAddress- 查询pos账户的pow地址 -
addressToIdentifier- 查询一个pow账户的pos地址
该合约的合约地址为0x0888000000000000000000000000000000000005
该合约的abi如下:
// SPDX-License-Identifier: MIT
pragma solidity >=0.5.0;

interface PoSRegister {
    /**
     * @dev Register PoS account
     * @param indentifier - PoS account address to register
     * @param votePower - votes count
     * @param blsPubKey - BLS public key
     * @param vrfPubKey - VRF public key
     * @param blsPubKeyProof - BLS public key's proof of legality, used to against some attack, generated by conflux-rust fullnode
     */
    function register(
        bytes32 indentifier,
        uint64 votePower,
        bytes calldata blsPubKey,
        bytes calldata vrfPubKey,
        bytes[2] calldata blsPubKeyProof
    ) external;

    /**
     * @dev Increase specified number votes for msg.sender
     * @param votePower - count of votes to increase
     */
    function increaseStake(uint64 votePower) external;

    /**
     * @dev Retire specified number votes for msg.sender
     * @param votePower - count of votes to retire
     */
    function retire(uint64 votePower) external;

    /**
     * @dev Query PoS account's lock info. Include "totalStakedVotes" and "totalUnlockedVotes"
     * @param identifier - PoS address
     */
    function getVotes(bytes32 identifier) external view returns (uint256, uint256);

    /**
     * @dev Query the PoW address binding with specified PoS address
     * @param identifier - PoS address
     */
    function identifierToAddress(bytes32 identifier) external view returns (address);

    /**
     * @dev Query the PoS address binding with specified PoW address
     * @param addr - PoW address
     */
    function addressToIdentifier(address addr) external view returns (bytes32);

    /**
     * @dev Emitted when register method executed successfully
     */
    event Register(bytes32 indexed identifier, bytes blsPubKey, bytes vrfPubKey);

    /**
     * @dev Emitted when increaseStake method executed successfully
     */
    event IncreaseStake(bytes32 indexed identifier, uint64 votePower);

    /**
     * @dev Emitted when retire method executed successfully
     */
    event Retire(bytes32 indexed identifier, uint64 votePower);
}
具体的介绍可见posRegister
那么如何去调用该合约呢?可以参考java-examples
Day3 CrossSpaceCall
Conflux通过分片,存在core space与esapce。core space与espace的账户间存在一一对应关系。CrossSpaceCall为用户提供了一系列方法实现两个space的交互。
该合约的方法如下:
-
createEVM- 在espace上部署一个合约 -
transferEVM- 向espace的映射账户转账 -
callEVM- 调用espace上的合约 -
staticCallEVM- 静态调用espace上的合约 -
withdrawFromMapped- 从espace上的账户中收回一部分的token -
mappedBalance- 查询映射账户的余额 -
mappedNonce- 查询映射账户的nonce
该合约的地址为0x0888000000000000000000000000000000000006
该合约的abi如下:
// SPDX-License-Identifier: MIT
pragma solidity >=0.5.0;

interface CrossSpaceCall {

    event Call(bytes20 indexed sender, bytes20 indexed receiver, uint256 value, uint256 nonce, bytes data);

    event Create(bytes20 indexed sender, bytes20 indexed contract_address, uint256 value, uint256 nonce, bytes init);

    event Withdraw(bytes20 indexed sender, address indexed receiver, uint256 value, uint256 nonce);

    event Outcome(bool success);

    function createEVM(bytes calldata init) external payable returns (bytes20);

    function transferEVM(bytes20 to) external payable returns (bytes memory output);

    function callEVM(bytes20 to, bytes calldata data) external payable returns (bytes memory output);

    function staticCallEVM(bytes20 to, bytes calldata data) external view returns (bytes memory output);

    function withdrawFromMapped(uint256 value) external;

    function mappedBalance(address addr) external view returns (uint256);

    function mappedNonce(address addr) external view returns (uint256);
}
具体的介绍可见CrossSpaceCall
那么如何去调用该合约呢?可以参考java-examples
那么如何将core space的地址转为espace的地址呢?java-sdk提供了方法
    public String getMappedEVMSpaceAddress() {
        String hexAddr =  this.getHexAddress();
        hexAddr = hexAddr.substring(2, hexAddr.length());
        byte[] t = Hash.sha3(Numeric.hexStringToByteArray(hexAddr));

        byte[] mappedBuf = new byte[20];
		   System.arraycopy(t, t.length - 20, mappedBuf, 0, 20);

        return Keys.toChecksumAddress("0x" + BaseEncoding.base16().encode(mappedBuf));
    }
Day4 ParamsControl
ParamsControl合约为在不用硬分叉的情况下去修改区块奖励等全局参数成为可能。该合约由CIP-94引入。
该合约的方法如下:
-
readVote- 查询指定账户的投票数据 -
castVote- 为链参数进行投票 -
readVote- 从espace上的账户中收回一部分的token -
currentRound- 查询目前的投票轮数 -
totalVotes- 查询在指定的投票轮中的投票数量
该合约的地址为0x0888000000000000000000000000000000000006
该合约的abi如下:
// SPDX-License-Identifier: MIT

pragma solidity >=0.8.0;

interface ParamsControl {
    struct Vote {
        uint16 topic_index;
        uint256[3] votes;
    }

    /*** Query Functions ***/
    /**
     * @dev cast vote for parameters
     * @param vote_round The round to vote for
     * @param vote_data The list of votes to cast
     */
    function castVote(uint64 vote_round, Vote[] calldata vote_data) external;

    /**
     * @dev read the vote data of an account
     * @param addr The address of the account to read
     */
    function readVote(address addr) external view returns (Vote[] memory);

    /**
     * @dev Current vote round
     */
    function currentRound() external view returns (uint64);

    /**
     * @dev read the total votes of given round
     * @param vote_round The vote number
     */
    function totalVotes(uint64 vote_round) external view returns (Vote[] memory);

    event CastVote(uint64 indexed vote_round, address indexed addr, uint16 indexed topic_index, uint256[3] votes);
    event RevokeVote(uint64 indexed vote_round, address indexed addr, uint16 indexed topic_index, uint256[3] votes);
}
调用该合约的方法与更加详细的讲解可见JS交互方法
v2分叉后的内置合约讲完啦~其余的V1版本的合约介绍可见内置合约
Week12 Contract address
9.20 Conflux 中 create2 地址的计算
与以太坊相同,Conflux 支持在合约中以 create2 部署合约至指定地址。Conflux 中由 create2 部署的合约地址计算方式与以太坊中大体相同,不同点在于Conflux会修改地址的首位以标识地址的类型。下面的代码描述了合约的hex地址具体的计算方式:
# 也可以使用 Web3.py
# from web3 import Web3
from conflux_web3 import Web3

# 尽量保证salt为bytes32,以避免编码方式带来的计算结果不匹配
def compute_address_using_salt(salt: bytes, bytecode_hash: bytes, deployer: HexAddress):
    core_part = Web3.solidityKeccak(
        ["bytes1", "address", "bytes32", "bytes32"],
        ["0xff", deployer, salt, bytecode_hash]
    )
    return "0x8"+ core_part.hex()[-39:]
9.21 Conflux 中合约部署地址的计算
Conflux 中合约部署地址的计算(非create2)与以太坊有较大不同。在以太坊中,合约部署的地址与部署者地址与nonce相关,合约的字节码不会对部署的地址造成影响。但在Conflux中,合约的字节码也会影响部署的地址。其计算方式与create2类似,下面的代码描述了合约的hex地址具体的计算方式:
# 也可以使用 Web3.py
# from web3 import Web3
from conflux_web3 import Web3

def compute_address_using_nonce(nonce: int, bytecode_hash: bytes, deployer: HexAddress):
    core_part = Web3.solidityKeccak(
        ["bytes1", "address", "bytes32", "bytes32"],
        ["0x00", deployer, nonce.to_bytes(32, "little"), bytecode_hash]
    )
    return "0x8"+ core_part.hex()[-39:]
9.22 Create2Factory 合约
Conflux 在 CIP-31 中引入了 Create2Factory 合约。该合约hex地址为0x8a3a92281df6497105513b18543fd3b60c778e40,借助该合约,开发者能够方便地调用create2操作码,将合约部署至特定地址。
9.23 在Conflux中使用OppenZeppelin的Clones, Create2合约
OppenZeppelin 提供了Clones合约与Create2合约帮助开发者部署minimal proxy合约或使用create2字节码部署合约。对于习惯使用OppenZeppelin的开发者,conflux-contracts中也提供了对应的代码,对合约地址计算进行了适配。代码见Clones.sol, Create2.sol。
Week13 - 9.26
Day1 存储抵押
Conflux Core Space 引入了存储抵押 (CFS) 机制作为使用存储的定价方法。与以太坊的一次性存储费相比,CFS 机制会更加公平合理。原则上,该机制需要锁定一定数量的资金作为抵押品来占用存储空间。在相应的存储空间被释放或被他人覆盖之前,抵押品将被锁定,锁定的CFX产生的相应利息将直接分配给矿工,用于维护存储空间。因此,Conflux 的存储成本也取决于存储空间被占用的时间长短。
存储抵押计算公式为 存储抵押 = 占用字节数 * 1CFX /1024 ;即每占用1KB空间,需要支付1CFX
使用场景
当操作智能合约且导致新增存储空间时,就需要为该新增的存储支付存储抵押
举个栗子
如下面是一个最简化的只有mint功能的ERC20合约
pragma solidity ^0.8.0;
contract MinimalERC20 {
    mapping(address => uint256) public balances;

    function mint(address account, uint256 amount) public {
        balances[account] += amount;
    }
}
一开始用户a的balance是0,所以balances中没有用户a的状态;当 mint(a,10)时,用户a的balance变为10。
这时变量balances会新增一对存储,key为a,value为10。
在合约中address和uint256都是占用32个字节;所以需要为该存储抵押64*1CFX/1024=0.0625CFX。
而当释放该存储时该存储抵押将原路退还给存储抵押支付者。
更多详细介绍请参见存储抵押
Day2 Keystore
无论在保存或者传输私钥时都有可能被泄露的风险,所以对私钥加密后再保存或传输更为稳妥。传统文件通常采用ZIP或者RAR压缩包的方法来加密;而区块链世界更通用的方式是采用 keystore 格式加密存储,keystore格式也可以被多数钱包APP及客户端所导入、导出。
keystore生成过程,历经4个步骤:
- 通过 KDF 的算法的变种算法 Scrypt 算法,将我们选中的密码:123456,变换为一个 AES-128-CTR 对称加密算法所能采用的加密密匙 S 。
- 使用该密匙 S 通过 AES-128-CTR 对称加密算法加密明文的以太坊私钥。
- 将 2 步骤生成的结果保存为密文 cyphertext 。
- 为了防止可能的篡改或数据变更,将 cyphertext 与 S 联合起来作为输入,使用 SHA3 哈希算法对该值进行带入求值,得到一个完整性校验签名。
keystore解密的过程与生成过程相反:
- 用户输入准确的密码 123456 后,通过 KDF 的 Scrypt 算法先计算出解密密匙 S’ 。
- 如果密码正确,S = S’ ,否则提示用户密码输入错误。
- 最终通过 S’,经由 AES-128-CTR 对称加密算法反向计算出私钥。
加密后的keystore 如代码清单下所示:
{
  "version": 3,
  "id": "7d5d99c8-f455-49aa-8b89-6c795a7cdd46",
  "address": "7c52e508c07558c287d5a453475954f6a547ec41",
  "crypto": {
      "kdf": "scrypt",
      "kdfparams": {
          "dklen": 32,
          "salt": "a4f9677eaf6f72394da51e16695899ad3e9b4f2228ad4eca5ef2a5c36093fe12",
          "n": 262144,
          "r": 8,
          "p": 1
      },
      "cipher": "aes-128-ctr",
      "ciphertext": "d89df5ef74f51ae485308e6dce8991dd80674e111f8073f9efa52cb2dd6eca3f",
      "cipherparams": {
          "iv": "6b064c5b09a154d9877d3a07e610a567"
      },
      "mac": "30949eb085ce342a6a488fd51fa5e3231e45f7515efa10c19ea0d46270c73f06"
  }
}
这串 JSON 格式的 keystore 代码可以被市面上大多数钱包 App 读取并合法导入。当导入时,仅需根据客户端程序提示输入 123456 将其解密即可。在网络中传输 keystore 是安全的,因为即使黑客窃取到了密文也不知道如何解密。
在 keystore 中的重要参数和对应的解释如下表。
| 名词 | 解释 |
|---|---|
| id | 随机生成的一个 uuid 格式的字符串 |
| address | 该 keystore 对应的公开地址 |
| crypto | 加密后的密文区域以及加密参数 |
| kdf | 全称Key Derivation Function,加密密匙生成算法, 举例中选用了Scrypt 算法 |
| kdfparams | Scrypt 算法所需要的必要参数 |
| cypher | 加密私钥选用的对称加密算法,举例中选用了AES-128-CTR 算法 |
| cyphertext | 加密后的密码文 |
| cypherparams | AES-128-CTR 算法所需要的必要输入参数 |
| mac | cyphertext与加密密匙的校验值,防止keystore被中途篡改 |
当前 go-conflux-sdk,js-conflux-sdk,java-conflux-sdk 都支持创建和导入导出keystore文件;其它sdk后续也会支持
参考文章:
- https://ethbook.abyteahead.com/ch2/keystore.html
Day3 Conflux智能合约开发工具
为了方便开发者更快速的开发Dapp,Conflux 提供了如下智能合约开发工具
详情参见 Tools
Day4 代理合约
Solidity合约部署在链上之后,代码是不可变的(immutable)。这样既有优点,也有缺点:
- 优点:安全,用户知道会发生什么(大部分时候)。
- 缺点:就算合约中存在bug,也不能修改或升级,只能部署新合约。但是新合约的地址与旧的不一样,且合约的数据也需要花费大量gas进行迁移。
有没有办法在合约部署后进行修改或升级呢?答案是有的,那就是代理模式。
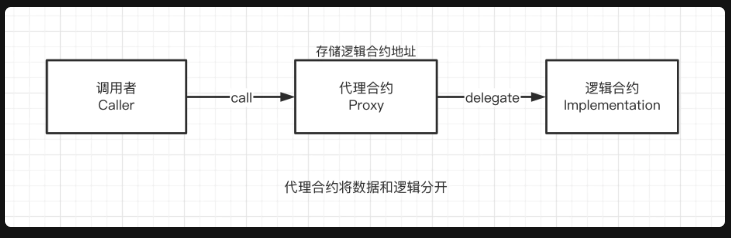
代理模式将合约数据和逻辑分开,分别保存在不同合约中。我们拿上图中简单的代理合约为例,数据(状态变量)存储在代理合约中,而逻辑(函数)保存在另一个逻辑合约中。代理合约(Proxy)通过delegatecall,将函数调用全权委托给逻辑合约(Implementation)执行,再把最终的结果返回给调用者(Caller)。
代理模式主要有两个好处:
- 可升级:当我们需要升级合约的逻辑时,只需要将代理合约指向新的逻辑合约。
- 省gas:如果多个合约复用一套逻辑,我们只需部署一个逻辑合约,然后再部署多个只保存数据的代理合约,指向逻辑合约。
详情及示例请参见这里
Day5 最小化代理合约-EIP1167
EIP1167是最小化的代理合约,特点是不能修改逻辑合约的地址,同时也意味着合约不可升级,对于用户来说没有安全风险。其最大的优点是可以极大节省gas消耗。
具体实现可以参考 openzepplin 的 clone 合约。
参考文章
- https://eips.ethereum.org/EIPS/eip-1167
- https://mirror.xyz/xyyme.eth/mmUAYWFLfcHGCEFg8903SweY3Sl-xIACZNDXOJ3twz8
Week14-节点运行常见问题
Day1 - 常见节点运行注意事项
- 保证节点机器配置足够:4C 16G内存 足够的硬盘空间(fullnode 700G archivenode 1.5T)
- Linux 系统建议提高系统最大文件打开数
- 使用官方提供的节点数据快照启动节点时,首次启动会需要额外的硬盘空间用户节点状态重建,所需额外空间为 100-500G,
Day2 - 如何判断节点是否同步到最新,是否还在同步
是否同步到最新
可根据节点同步日志的 Catch-up mode 来判断节点是否同步到最新,如果 catch-up mode 为 false,则表示已经同步到最新
cfxcore::syn - Catch-up mode: false, latest epoch: 56218274 missing_bodies: 0
是否还在同步
可根据节点运行日志 Catch-up mode 后边的 latest epoch 数值判断节点是否在进行同步,正常情况该数字会不断增长。
如果该数值不增长,也可根据 Statistics: StatisticsInner 的数值判断节点是否在正常工作,如果 inserted_block_count, inserted_header_count, inserted_block_count, activated_block_count, processed_block_count 几个数值中任一数值在增长,都表示节点在正常工作。
2022-10-11T22:00:32.918557596+08:00 INFO IO Worker #1 cfxcore::sta - Statistics: StatisticsInner { sync_graph: SyncGraphStatistics { inserted_block_count: 198117, inserted_header_count: 371367 }, consensus_graph: ConsensusGraphStatistics { inserted_block_count: 136125, activated_block_count: 371361, processed_block_count: 371366 } }
另外节点在重启时,会需要花费大量时间重建状态,此操作过程中,上述数值不会变化,但此为正常现象。此过程最长可能持续数小时。可耐心等待。
Day3 - 为什么我的节点不同步数据
节点数据不同步可能有以下几种情况:
- 节点重启或,使用数据快照启动节点,此种情况,节点启动后,需要花大量的时间重建状态,可能长达几小时
- 节点机器的磁盘空间不够
- 节点启动时未正确指定配置文件,导致节点找不到 bootnode,从而无法跟 peer 建立连接,也就无法同步数据
- 节点网络有问题,导致无法同步数据
- 节点数据丢失或损坏(数据不完整),早成此种情况的原因可能有数据快照下载不全;节点数据移动时未移动完整,只移动了pow 数据,pos 数据未移动
Day4 - 节点启动失败
Err value: PKCS#8 cryptographic error
此种错误大概率是因为 pos_key 密码输入错误, 无法解码 pos_key 内容导致
failed to start full client: Os { code: 6, kind: Uncategorized, message: "No such device or address" }
如果节点启动方式为 Docker,或 daemon 方式启动,且配置文件中未配置 pos_key 密码,这时节点读取密码时无法读取”标准输入“设备所导致。
此种情况可将密码配置到配置文件中 dev_pos_private_key_encryption_password
Day5 - pos_key 密码忘记
如果忘记节点启动时输入的 pos_key,且未参与 pos 共识,此时可直接删掉 pos_config/pos_key, 以及 pos_db/secure_storage.json 文件,重新启动节点,并设置新的密码即可
Week15 - 10.17
事件订阅
java-sdk目前支持了事件订阅,那么如何去订阅对应的事件呢?对应的例子奉上~
    public static void pubsub() throws ConnectException {
        WebSocketService wsService = new WebSocketService("wss://test.confluxrpc.com/ws", false);
        wsService.connect();
        Cfx cfx = Cfx.create(wsService);

        // add the filter
        BigInteger cur = cfx.getEpochNumber().sendAndGet();
        // construct the filter parameter
        LogFilter filter = new LogFilter();

        // filter details
//        filter.setFromEpoch(Epoch.numberOf(cur));
//        filter.setToEpoch(Epoch.numberOf(cur.add(new BigInteger("20"))));
//        // To filter address
//        List<Address> toFilterAddress = new ArrayList<Address>();
//        toFilterAddress.add(new Address("cfxtest:aajb342mw5kzad6pjjkdz0wxx0tr54nfwpbu6yaj49"));
//        filter.setAddress(toFilterAddress);

        // subscribe epoch events
//             Flowable<EpochNotification> events1 = cfx.subscribeEpochs();
//             Disposable disposable1 = events1.subscribe(event -> {
//                // You can get the detail through getters
//                  System.out.println(event.getParams().getResult().getEpochNumber());
//                 System.out.println("epoch");
//            });
//
//            disposable1.dispose();

        // subscribe newheads events
        cfx.subscribeNewHeads().subscribe(event -> {
            // You can get the detail through getters
            System.out.println(event.getParams().getResult().getEpochNumber());
        }, error -> {
            error.printStackTrace();
        });

        // subscribe log events
//        cfx.subscribeLogs(filter).subscribe(event -> {
//            // You can get the detail through getters
//            System.out.println(event.getParams().getResult().getLogIndex());
//        }, error -> {
//            error.printStackTrace();
//        });
    }
批量转账
最新的conflux-java sdk基于web3j的batch request类,支持了Batch RPC。本次的tip给出了对应的例程
    public static void test() throws Exception{
        Cfx t = Cfx.create("https://test.confluxrpc.com");
        Web3j client = Web3j.build(new HttpService("https://test.confluxrpc.com"));
        Account acc = Account.create(t, "fjkaldsdjfasxjvzlkxjczxlkjfas"); //replace with your private key or to export the account from the keystore.
        Account.Option option = new Account.Option();
        RawTransaction tx = option.buildTx(t, new Address("cfxtest:aajb342mw5kzad6pjjkdz0wxx0tr54nfwpbu6yaj49"), acc.getPoolNonce(), new Address("cfxtest:aar9up0wsbgtw7f0g5tyc4hbwb2wa5wf7emmk94znd"), null);
        RawTransaction tx1 = option.buildTx(t, new Address("cfxtest:aajb342mw5kzad6pjjkdz0wxx0tr54nfwpbu6yaj49"), acc.getPoolNonce().add(BigInteger.ONE), new Address("cfxtest:aar9up0wsbgtw7f0g5tyc4hbwb2wa5wf7emmk94znd"), null);
        RawTransaction tx2 = option.buildTx(t, new Address("cfxtest:aajb342mw5kzad6pjjkdz0wxx0tr54nfwpbu6yaj49"), acc.getPoolNonce().add(BigInteger.TWO), new Address("cfxtest:aar9up0wsbgtw7f0g5tyc4hbwb2wa5wf7emmk94znd"), null);
        RawTransaction tx3 = option.buildTx(t, new Address("cfxtest:aajb342mw5kzad6pjjkdz0wxx0tr54nfwpbu6yaj49"), acc.getPoolNonce().add(BigInteger.valueOf(3)), new Address("cfxtest:aar9up0wsbgtw7f0g5tyc4hbwb2wa5wf7emmk94znd"), null);

        tx.setValue(BigInteger.valueOf(100));
        String signedTx = acc.sign(tx);
        String signedTx1 = acc.sign(tx1);
        String signedTx2 = acc.sign(tx2);
        String signedTx3 = acc.sign(tx3);

        BatchResponse resp = client.newBatch()
                .add(t.sendRawTransaction(signedTx))
                .add(t.sendRawTransaction(signedTx1))
                .add(t.sendRawTransaction(signedTx2))
                .add(t.sendRawTransaction(signedTx3))
                .send();

        System.out.println(resp.getResponses().get(0).getResult());
    }
主要的思路为:
创建web3j的client -> 创建转账交易的rawtransaction -> 将交易进行签名 -> 将签名交易放入web3jclient的batch队列中 -> 发送交易
在交易执行成功后,可以通过一个迭代器,去获取每一笔交易的哈希值。 需要注意的是,目前的java-sdk中需要手动对nonce进行增加,而这一点会在后续的开发当中予以优化。
批量调用合约
批量调用合约于转账交易的思路是一样的,也是创建web3j的client -> 创建转账交易的rawtransaction -> 将交易进行签名 -> 将签名交易放入web3jclient的batch队列中 -> 发送交易
以下给出的例子以ERC20为例:
    public static void batchTx() throws Exception {
        String addr = "cfxtest:acffj2hwbrwbsxuk56jne9913xvmwj5g4u7syhbfr2";
        Cfx cfx = Cfx.create("https://test.confluxrpc.com");
        Web3j client = Web3j.build(new HttpService("https://test.confluxrpc.com"));
        Account acc = Account.create(cfx, "fjkaldsdjfasxjvzlkxjczxlkjfas"); //replace with your own private key.
        BigInteger amount = BigInteger.valueOf(100);
        String data = call(new Address(addr), "transfer", new Address("cfxtest:aar9up0wsbgtw7f0g5tyc4hbwb2wa5wf7emmk94znd").getABIAddress(), new Uint256(amount));

        Account.Option option = new Account.Option();
        RawTransaction tx = option.buildTx(cfx, new Address("cfxtest:aajb342mw5kzad6pjjkdz0wxx0tr54nfwpbu6yaj49"), acc.getPoolNonce(), new Address(addr), data);
        RawTransaction tx1 = option.buildTx(cfx, new Address("cfxtest:aajb342mw5kzad6pjjkdz0wxx0tr54nfwpbu6yaj49"), acc.getPoolNonce().add(BigInteger.ONE), new Address(addr), data);
        RawTransaction tx2 = option.buildTx(cfx, new Address("cfxtest:aajb342mw5kzad6pjjkdz0wxx0tr54nfwpbu6yaj49"), acc.getPoolNonce().add(BigInteger.TWO), new Address(addr), data);

        String signedTx = acc.sign(tx);
        String signedTx1 = acc.sign(tx1);
        String signedTx2 = acc.sign(tx2);


        BatchResponse resp = client.newBatch()
        .add(cfx.sendRawTransaction(signedTx))
        .add(cfx.sendRawTransaction(signedTx1))
        .add(cfx.sendRawTransaction(signedTx2))
        .send();

        System.out.println(resp.getResponses().get(0).getResult());

        }

    public static String call(String method, Type<?>... inputs) throws Exception {

            Function function = new Function(method, Arrays.asList(inputs), Collections.emptyList());
            String data = FunctionEncoder.encode(function);


        return data ;
    }
查询链上信息&查询合约功能
查询方法不需要去构建交易,只需要去创建call方法的request,就能将其放入web3j的batch队列中。在得到查询结果的rawdata后,需要去调用DecodeUtil.decode方法去进行解析。
具体的有:
    public static void queryInfo() throws Exception{
        Cfx t = Cfx.create("https://test.confluxrpc.com");
        Web3j client = Web3j.build(new HttpService("https://test.confluxrpc.com"));

        BatchResponse resp = client.newBatch()
                .add(t.getBestBlockHash())
                .add(t.getBalance(new Address("cfxtest:aajb342mw5kzad6pjjkdz0wxx0tr54nfwpbu6yaj49")))
                .add(t.getEpochNumber())
                .send();

        System.out.println(Numeric.decodeQuantity(resp.getResponses().get(2).getResult().toString()));
        System.out.println(resp.getResponses().get(0).getResult().toString());
        System.out.println(Numeric.decodeQuantity(resp.getResponses().get(1).getResult().toString()));
    }

// 以ERC20为例
    public static void batchQueryContract() throws Exception {
        String addr = "cfxtest:acffj2hwbrwbsxuk56jne9913xvmwj5g4u7syhbfr2";
        Cfx cfx = Cfx.create("https://test.confluxrpc.com");
        Web3j client = Web3j.build(new HttpService("https://test.confluxrpc.com"));
        ContractCall call = new ContractCall(cfx, new Address(addr));


        ContractCall call1 = new ContractCall(cfx, new Address(addr));
        ContractCall call2 = new ContractCall(cfx, new Address(addr));
        ContractCall call3 = new ContractCall(cfx, new Address(addr));

        BatchResponse resp = client.newBatch()
                .add(call.call("name"))
                .add(call1.call("symbol"))
                .add(call2.call("totalSupply"))
                .add(call3.call("decimals"))
                .send();
        String name = DecodeUtil.decode(resp.getResponses().get(0).getResult().toString(), Utf8String.class);
        String symbol = DecodeUtil.decode(resp.getResponses().get(1).getResult().toString(), Utf8String.class);
        BigInteger decimals = DecodeUtil.decode(resp.getResponses().get(3).getResult().toString(), Uint8.class);
        BigInteger totalSupply = DecodeUtil.decode(resp.getResponses().get(2).getResult().toString(), Uint256.class);

        System.out.println(name);
        System.out.println(symbol);
        System.out.println(decimals);
        System.out.println(totalSupply);
        }
ERC4907
简介
ERC4907是ERC721的扩展,能够完全向下兼容ERC721。本质上来说,该提案是一个租赁合约。实现了NFT所有权和使用权的分离
动机
在某些场景下,NFT的使用者和所有者并不是相同的,如,在游戏中的租赁系统。ERC4907就是脱胎于这个需求,实现了所有权和使用权的分离。
这种设计模式已经在某些项目当中被使用,ERC4907提出了一个正式的标准,去进行规范。
解决的问题
ERC4907的提出解决了以下三个问题
权利的分离
通过User和owner的角色管理,实现不同角色对NFT的权利的分离。对owner来说,通过ERC4907,它可以设置该NFT的用户,且其他项目也能够将自己的权利分配给owner或user。
链上所有权时限管理
通过ERC4907,user对某个NFT的所有权将随着expire时间的到来而自动失去,而不用像原来一样,再发送一笔交易
租赁流程
-
A 签署租赁合约可以转让A 拥有的NFT。
-
A 将想出租的NFT 清单发送到租赁合约上。
-
B 选择一个租赁时间,租金根据租赁时间和租金价格计算。B 转移代币作为租金,租赁合约将NFT 从A 转移到租赁合约地址上,并将NFT 的用户设置为B,设置到期时间为租赁时间。
-
当租约到期时,A 可以从租约中赎回NFT。
接口实现
interface IERC4907 {

    // Logged when the user of an NFT is changed or expires is changed
    /// @notice Emitted when the `user` of an NFT or the `expires` of the `user` is changed
    /// The zero address for user indicates that there is no user address
    event UpdateUser(uint256 indexed tokenId, address indexed user, uint64 expires);

    /// @notice set the user and expires of an NFT
    /// @dev The zero address indicates there is no user
    /// Throws if `tokenId` is not valid NFT
    /// @param user  The new user of the NFT
    /// @param expires  UNIX timestamp, The new user could use the NFT before expires
    function setUser(uint256 tokenId, address user, uint64 expires) external;

    /// @notice Get the user address of an NFT
    /// @dev The zero address indicates that there is no user or the user is expired
    /// @param tokenId The NFT to get the user address for
    /// @return The user address for this NFT
    function userOf(uint256 tokenId) external view returns(address);

    /// @notice Get the user expires of an NFT
    /// @dev The zero value indicates that there is no user
    /// @param tokenId The NFT to get the user expires for
    /// @return The user expires for this NFT
    function userExpires(uint256 tokenId) external view returns(uint256);
}
The userOf(uint256 tokenId) function MAY be implemented as pure or view.
The userExpires(uint256 tokenId) function MAY be implemented as pure or view.
The setUser(uint256 tokenId, address user, uint64 expires) function MAY be implemented as public or external.
The UpdateUser event MUST be emitted when a user address is changed or the user expires is changed.
The supportsInterface method MUST return true when called with 0xad092b5c.
例程
Week16: 10.24 - 10.28 python-sdk
本周将对新版 python-conflux-sdk 进行介绍。python-conflux-sdk 基于 web3.py 进行开发,尽量保证了API的兼容。目前 python sdk 支持 3.8 <= python version <= 3.10。
安装方式
python -m venv venv
source ./venv/bin/activate
pip install conflux-web3
10.24 python-conflux-sdk: Base32Address
Conflux 目前将 Base32 格式地址作为默认的地址格式,python sdk 也提供了相应类便于开发者操作地址。 Base32Address 类继承自 python 内置字符串类 str ,并提供了常用的编码、解码方法,重写了 ==运算符(__eq__)的判断方式。详细文档可以参考 -> Base32Address
>>> from cfx_address import Base32Address
>>> address = Base32Address("0x1ecde7223747601823f7535d7968ba98b4881e09", network_id=1)
'cfxtest:aatp533cg7d0agbd87kz48nj1mpnkca8be1rz695j4'
>>> address_ = Base32Address(address, network_id=1029, verbose=True)
>>> address_
'CFX:TYPE.USER:AATP533CG7D0AGBD87KZ48NJ1MPNKCA8BE7GGP3VPU'
>>> isinstance(address_, str)
True
>>> address_ == 'cfxtest:aatp533cg7d0agbd87kz48nj1mpnkca8be1rz695j4'
True
>>> [
...     address.address_type,
...     address.network_id,
...     address.hex_address,
...     address.verbose_address,
...     address.abbr,
...     address.mapped_evm_space_address,
...     address.eth_checksum_address,
... ]
['user', 1, '0x1ecde7223747601823f7535d7968ba98b4881e09', 'CFXTEST:TYPE.USER:AATP533CG7D0AGBD87KZ48NJ1MPNKCA8BE1RZ695J4', 'cfxtest:aat...95j4', '0x349f086998cF4a0C5a00b853a0E93239D81A97f6', '0x1ECdE7223747601823f7535d7968Ba98b4881E09']
在 python-conflux-sdk(conflux-web3) 中所有的地址类型返回值均使用 Base32Address 进行了封装方便开发者进行操作;对于输入,conflux-web3 也支持str/Base32Address类型的地址作为输入。
>>> from conflux_web3 import Web3
>>> w3 = Web3(Web3.HTTPProvider("https://test.confluxrpc.com"))
>>> miner = w3.cfx.get_block_by_epoch_number("latest_mined")["miner"]
>>> miner.address_type
'user'
10.25 python-conflux-sdk: wallet
在web3.py中,一般需要通过手动调用函数construct_sign_and_send_raw_middleware构造自动签名中间件,进而实现send_transaction方法与合约方法的自动签名。
# `web3.py`的文档中提供了`construct_sign_and_send_raw_middleware`的使用方法
from web3 import Web3, EthereumTesterProvider
w3 = Web3(EthereumTesterProvider)
from web3.middleware import construct_sign_and_send_raw_middleware
from eth_account import Account
acct = Account.create('random string')
w3.middleware_onion.add(construct_sign_and_send_raw_middleware(acct))
w3.eth.default_account = acct.address
legacy_transaction = {
    'to': Account.create('another random string'),
    'value': 22,
    'gasPrice': 123456,  # optional - if not provided, gas_price_strategy (if exists) or eth_gasPrice is used
}
w3.eth.send_transaction(legacy_transaction)
python-conflux-sdk 支持类似的使用方式(但需要从conflux_web3.middleware中引入construct_sign_and_send_raw_middleware),同时优化了中间件的实现方式与API的使用方式,提供了更友好的API。
from conflux_web3 import Web3
from cfx_account import LocalAccount
w3 = Web3(Web3.HTTPProvider("https://test.confluxrpc.com"))
acct:LocalAccount = w3.account.create("random string")

w3.cfx.default_account = acct
# default_account 被设置为 LocalAccount 类型变量时等价于
# w3.wallet.add_account(acct)
# w3.cfx.default_account = acct.address

# 在钱包中添加账户后交易会根据交易的 from 字段进行自动签名
# 若 from 字段为空则会将 w3.cfx.default_account 作为交易的 from 账户
transaction = {
    'to': w3.address.zero_address(network_id=1),
    'value': 22,
    'gasPrice': 10**9,
}
w3.cfx.send_transaction(transaction).executed()
# wallet 中允许存在多个 account
assert acct.address in w3.wallet
acct_ = w3.account.from_key("FILL YOUR SECRET KEY HERE")
w3.wallet.add_account(acct_)
assert (acct.address in w3.wallet) and (acct_ in w3.wallet)

transaction = {
    'to': w3.address.zero_address(network_id=1),
    'value': 22,
    'gasPrice': 10**9,
  	'from': acct_.address
}
w3.cfx.send_transaction(transaction).executed()
10.26 python-conflux-sdk: 交易状态的追踪
向节点发送交易后,常常需要跟踪交易的状态。在以太坊中,交易状态相对简单,因此 web3.py 仅提供了 wait_for_transaction_receipt 方法用于交易状态的追踪。Conflux 中交易的状态稍复杂,可分为以下五个阶段:
- pending:交易发送至节点,但并未被包含在区块中。
- mined:交易已被包含在上链区块中。
- executed:交易已被执行(交易上链 5 个 epoch 后才会被执行)。
- confirmed:交易已被 PoW 链确认,除非受到算力攻击,一般可认为交易不会被 revert。
- finalized:交易被 PoS 链确认,即使遭到算力攻击交易也不会被 revert ,但往往需要5-10分钟才能确认。
python-conflux-sdk 中也提供了对应的 API, 开发者可以使用wait_till_transaction_mined, wait_till_transaction_executed, wait_till_transaction_executed, wait_till_transaction_confirmed, wait_till_transaction_finalized API 以等待交易状态,同时sdk也对交易返回的哈希值进行了封装,以提供更简洁的 API。
from conflux_web3 import Web3
w3 = Web3(Web3.HTTPProvider("https://test.confluxrpc.com"))
acct = w3.account.create("random string")
w3.cfx.default_account = acct

transaction = {
    'to': w3.address.zero_address(network_id=1),
    'value': 22,
    'gasPrice': 10**9,
}
tx_hash = w3.cfx.send_transaction(transaction)

tx_hash.mined()
tx_hash.executed()
tx_hash.confirmed()
tx_hash.finalized()
10.27 python-conflux-sdk: 构造 contract 时的 name 参数
python-conflux-sdk 对内置合约与部分使用频率较高的合约提供了特殊的支持:在构造合约时,可以通过name参数指定特定合约名,便捷地构造合约对象,从而免去指定abi,bytecode,address等合约参数的麻烦。
from conflux_web3 import Web3
w3 = Web3(Web3.HTTPProvider("https://test.confluxrpc.com"))
acct = w3.account.create()
w3.default_account = acct

# 从 测试网水龙头领取测试网CFX
faucet = w3.cfx.contract(name="Faucet")
assert faucet.address == "cfxtest:acejjfa80vj06j2jgtz9pngkv423fhkuxj786kjr61"
faucet.functions.claimCfx().transact().executed()

# 部署ERC20合约
erc20_factory = w3.cfx.contract(name="ERC20")
contract_address = (erc20_factory.constructor(name="Coin", symbol="C", initialSupply=10**18)
                    .transact()
                    .executed()["contractCreated"])

# 使用部署的ERC20合约转账
erc20_instance = erc20_factory(contract_address)
erc20_instance.functions.transfer(w3.cfx.address.zero_address(network_id=1), 100).transact().executed()
Week 17 - 10.31 代理模式大阅兵
Day1 - EIP1967
之前讲到智能合约代理模式核心就是利用delegatcall来将合约调用从代理合约转发到实现合约。
而基于代理模式就容易实现可升级的合约,由于合约的变量存储都是存储在代理合约中的,而可升级的代理合约中除了保存业务本身所需的变量外,还需要保存升级合约相关变量,主要有逻辑合约地址和管理员地址等。
EIP-1967的目的就是规定一个通用的存储插槽使用标准,用于在代理合约中的特定位置存放逻辑合约的地址。其规定了如下特定的插槽:
=> 逻辑合约地址
bytes32(uint256(keccak256("eip1967.proxy.implementation") - 1))
更新该地址时,需要同时发出:
event Upgraded(address indexed implementation);

=> beacon地址
bytes32(uint256(keccak256("eip1967.proxy.beacon") - 1))
更新该地址时,需要发出:
event BeaconUpgraded(address indexed beacon);

=> admin 地址
bytes32(uint256(keccak256("eip1967.proxy.admin") - 1))
更新该地址时,需要发出:
event AdminChanged(address indexed previousAdmin, address newAdmin);
根据名称进行hash得到slot的位置来进行存储,避免了与合约变量slot位置冲突。
EIP1967详情参见 https://eips.ethereum.org/EIPS/eip-1967
Day2 - ERC1967Proxy
ERC1967Proxy 是 EIP1967 的openzepplin实现,它提供了一些修改 EIP1967 SLOT值的方法和事件,主要包括逻辑合约地址和管理员地址,具体实现参见 Openzepplin ERC1967Proxy
FUNCTIONS
constructor(_logic, _data)

_implementation()
ERC1967UPGRADE
_getImplementation()

_upgradeTo(newImplementation)

_upgradeToAndCall(newImplementation, data, forceCall)

_upgradeToAndCallUUPS(newImplementation, data, forceCall)

_getAdmin()

_changeAdmin(newAdmin)

_getBeacon()

_upgradeBeaconToAndCall(newBeacon, data, forceCall)
PROXY
_delegate(implementation)

_fallback()

fallback()

receive()

_beforeFallback()
EVENTS
ERC1967UPGRADE
Upgraded(implementation)

AdminChanged(previousAdmin, newAdmin)

BeaconUpgraded(beacon)
Day3 - Transparent Proxy
为避免代理函数选择器冲突的问题,Openzepplin实现了透明代理模式
Transparent Proxy 为暴露了合约升级相关方法的一个代理模式实现,而这种模式主要在EIP1967Proxy的基础上增加了如下功能
- 如果管理员以外的任何帐户调用代理,则该调用将被转发到实现,即使该调用与代理本身暴露的方法相同。
- 如果管理员调用代理,它可以访问管理功能,但它的调用永远不会被转发到实现合约。如果管理员试图在实现上调用一个函数,将会返回错误“admin cannot fallback to proxy target”。
这就意味着管理员帐户只能用于升级代理或更改管理员等管理员操作,因此最好是不使用的专用帐户其他任何事情。这将避免在尝试从代理实现调用函数时因突然错误而引起的头痛。
建议使用ProxyAdmin合约的实例作为管理员账户。
详情参见 https://docs.openzeppelin.com/contracts/4.x/api/proxy#transparent_proxy
Day4 - UUPS Proxy
在透明代理模式中,升级逻辑驻留在代理合约中--意味着升级是由代理处理的。必须调用upgradeTo(address newImpl)这样的函数来升级到一个新的实现合约。然而,由于这个逻辑放在代理合约里,部署这类代理的成本很高。
透明代理还需要管理机制来决定是委托调用实现中的功能还是执行代理合约本身的功能,以Box为例:
contract Box {
    uint256 private _value;

    function store(uint256 value) public { /*..*/ }

    function retrieve() public view returns (uint256) { /*..*/ }
}

contract BoxProxy {

     function _delegate(address implementation) internal virtual { /*..*/ }

     function getImplementationAddress() public view returns (address) { /*..*/ }

     fallback() external { /*..*/ }

     // Upgrade logic in Proxy contract
     upgradeTo(address newImpl) external {
         // Changes stored address of implementation of contract
         // at its slot in storage
     }
}
UUPS Proxy
UUPS模式首次在EIP1822提出。与透明模式不同,在UUPS中,升级逻辑是由实现合约本身处理的。因此该模式中,不需要再像Transparent模式那样区分管理员升级和普通函数调用,Proxy直接把所有的请求都通过delegatecall丢给Implementation(如果是升级,Implementation的升级函数会确认一下是否为管理员),因此不再需要ProxyAdmin。
实现合约包括升级逻辑的方法,以及通常的业务逻辑。你可以通过让它继承一个包括升级逻辑的通用标准接口来使任何实现合约符合UUPS标准,比如继承OpenZeppelin的UUPSUpgradeable接口:
contract Box is UUPSUpgradeable {
    uint256 private _value;

    function store(uint256 value) public { /*..*/ }

    function retrieve() public view returns (uint256) { /*..*/ }

     // Upgrade logic in Implementation contract
     upgradeTo(address newImpl) external {
         // Changes stored address of implementation of contract
         // at its slot in storage
     }
}

contract BoxProxy {

     function _delegate(address implementation) internal virtual { /*..*/ }

     function getImplementationAddress() public view returns (address) { /*..*/ }

     fallback() external { /*..*/ }

}
注意:使用UUPS代理模式时强烈建议继承这个接口来实现合约。因为如果不能在新版本的实现中包含升级逻辑(非UUPS兼容),就升级到它了,将永远锁定升级机制!因此建议你使用防止这种情况发生的措施的库(如UUPSUpgradeable)
参考文章:
- https://learnblockchain.cn/article/4257
- https://docs.openzeppelin.com/contracts/4.x/api/proxy#UUPSUpgradeable
Day5 - Beacon 模式
和前面2种模式不同,Beacon模式的Implementation地址并不存放在Proxy合约里,而是存放在Beacon合约里,Proxy合约里存放的是Beacon合约的地址。
在合约交互的时候,用户同样是和Proxy合约打交道,不过此时因为Proxy合约中并未保存Implementation地址,所以它要先访问Beacon合约获取Implementation地址,然后再通过delegatecall调用Implementation。
在合约升级的时候,管理员并不需要和Proxy合约打交道,而只需要交互Beacon合约,把Beacon合约存储的Implementation改掉就行了。
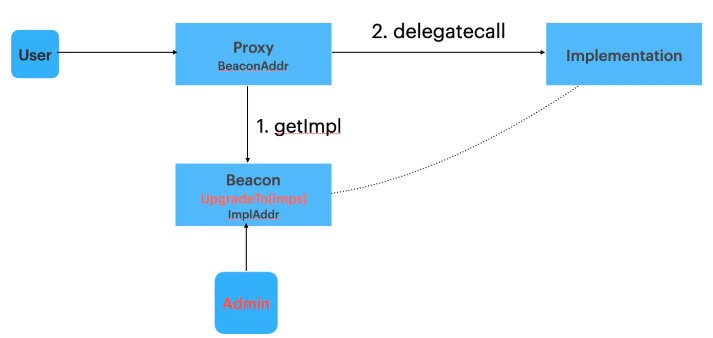
使用场景
通常当多个代理需要同时升级为相同的implementation时,适合使用Beacon模式,可以做到只需要修改Beacon合约的Implementation地址达到所有Proxy都升级的效果。
参考文章:
- https://docs.openzeppelin.com/contracts/4.x/api/proxy#beacon
- https://mirror.xyz/rbtree.eth/qDSQvenBZ_TWqZLUTlxiXVlhKQzPygRyv88EMFWxJro
Week18-Conflux 跨链桥汇总
Day1 Shuttleflow
Shuttleflow 是 Conflux 生态最早的跨链桥应用,支持 Conflux Core 网络,与其他主流 EVM 链之间(ETH,BSC, Bitcoin, Huobi Heco)的主流资产跨链.
该协议设计安全,从上线至今从未出现过资金安全问题。
Day2 ConfluxHub Space Bridge
Space Bridge 是 Conflux 两个 Space 的跨 Space bridge, 可以实现 CFX 以及主流 ERC20 代币的互跨操作。该 Bridge 使用 Core 空间的 CrossSpace 内置合约实现,具有原子安全性,且速度快。
Day3 ConfluxHub BSC-eSpace Bridge
使用该 Bridge 可以实现 CFX 在 BSC 和 eSpace 的直接跨链
Day4 multichain
Day5 celer bridge
Day6 meson
meson 是一个稳定币跨链桥,支持稳定币在 Core,eSpace 与主流链之间的互跨
Week19- 11.14
Day1 Java-Solidity-类型映射
基本类型
The basic types in solidity such as the uint256, bytes, byte32[] can be shown in the following.
| Solidity Type | web3j.abi type | conflux-Java-sdk Type | Example |
|---|---|---|---|
| uintxxx | Uintxxx | BigInteger | new Uint256(new BigInteger("111")) |
| address | Address | Address(cfx:xxxx) | new org.web3j.abi.Address(new Address("xxxxx")) |
| bool | Bool | Boolean | new Bool(true) |
| string | Utf8String | String | new Utf8String("heyman") |
| bytesxx | Bytesxx | byte[] | new Bytes32("111".getBytes()) |
| bytes | DynamicBytes | byte[] | new DynamicBytes("111".getBytes()) |
| Static Array (address[2]) | StaticArray2 | new StaticArray2<>(org.web3j.abi.datatypes.Address.class, xxx) | |
| Dynamic Array (address[]) | DynamicArray | new DynamicArray<>(org.web3j.abi.datatypes.Address.class, xxx) |
结构体
以下举了一个例子
struct Foo {
    Address[] addresses;
}
    public static class BasicAddressesStruct extends DynamicStruct {
        public List<org.web3j.abi.datatypes.Address> addr;

        public BasicAddressesStruct(List<org.web3j.abi.datatypes.Address> addr) {
            super(new org.web3j.abi.datatypes.DynamicArray<org.web3j.abi.datatypes.Address>(addr));
            this.addr = addr;
        }

        public BasicAddressesStruct(DynamicArray<org.web3j.abi.datatypes.Address> addr) {
            super(addr);
            this.addr = addr.getValue();
        }
    }
需要注意的是,若结构体中包含动态类型,如bytes[], string等,创建的类需要继承DynamicStruct,否则,需要继承StaticStruct
Day2 Decode响应
当我们查询合约时,返回的是一串hexstring。 本节开始将告诉大家如何将这一串hexstring转为相应的类型
单个基本类型
contractCall.callAndGet(Utf8String.class,"text", node, key)
多个基本类型
以java-sdk的posRegister的内置合约的getVotes方法为例
用一个TupleDecoder去对hexstring进行decode
        BigInteger[] res = new BigInteger[2];

        String rawData = this.call("getVotes", new Bytes32(Numeric.hexStringToByteArray(identifier))).sendAndGet();
        rawData = Numeric.cleanHexPrefix(rawData);
        TupleDecoder decoder = new TupleDecoder(rawData);
        res[0] = decoder.nextUint256();
        res[1] = decoder.nextUint256();
decoder还支持address和bytes之间的decode,具体可见
或者通过web3j的FunctionReturnDecoder进行decode
        String rawData = this.call("getVotes", new Bytes32(Numeric.hexStringToByteArray(identifier))).sendAndGet();

	List outputParameters = new ArrayList<TypeReference<Type>>();
	outputParameters.add(new TypeReference<Uint256>() {});
	outputParameters.add(new TypeReference<Uint256>() {});

	List<Type> list = FunctionReturnDecoder.decode(rawData, outputParameters);
Day3 结构体decode响应
结构体的解析方法跟多个基本类型的第二种方法一致,不同的是需要自定义一个结构体类。 以下举个例子
struct price{
   Uint256 base
   Uint256 premium
}
    public static class Price extends StaticStruct {
        public BigInteger base;
        public BigInteger premium;

        public Price(Uint256 base, Uint256 premium) {
            super(base,premium);
            this.base = base.getValue();
            this.premium = premium.getValue();
        }
    }
需要注意的是,由于该price结构体内部的成员均为Uint256,为定长类型,所以该结构体类继承的是StaticStruct。若其中包含不定长类型,则需要继承DynamicStruct
static void decodeStruct() {
  String structData = "0x00000000000000000000000000000000000000000000000000000000000000200000000000000000000000000000000000000000000000000000000000000060000000000000000000000000000000000000000000000000000000000000000a0000000000000000000000008f03f1a3f10c05e7cccf75c1fd10168e06659be7000000000000000000000000000000000000000000000000000000000000000568656c6c6f000000000000000000000000000000000000000000000000000000";
  TypeReference ts = new TypeReference<Price>() {};
  List<Type> list = DefaultFunctionReturnDecoder.decode(structData, Arrays.asList(ts));
  System.out.println(((Price)list.get(0)).base);
}
Day4 结构体参数调用问题反馈
Web3j对结构体中嵌套数组的类型支持有问题,当结构体中包含了DynamicArray类型或是StaticArray类型时,用以下语句去调用合约会报错
//struct BasicAddresses{
//	address[] addr;
//}

String hash = account.call(opt, contract_address, "write", basicAddresses);
通过测试,我们发现,该问题主要是由MethodSignature不同导致的,该signature的不同会导致methodid的不同,最后会导致encode产生的rawdata不用。
为了解决该问题,本教程提供了一个折衷的办法,大致的思路就是自己手动去生成一个methodid。由拼接思路可得,我们提供一个正确的methodid,再与其他的参数进行拼接,得到正确的rawdata。
具体的为重写web3j的DefaultFunctionEncoder.java中的encodeFunction:
    @Override
    public String encodeFunction(final Function function, String signature) {
      String methodId = buildMethodId(signature);
        final StringBuilder result = new StringBuilder(methodId);

        return encodeParameters(parameters, result);
    }
	// methodSignature的格式如下:方法名(参数)。其中,参数类型为结构体的表示为(xxx)。如:writeBasicAddressesStruct((address[]))

    public static String buildMethodId(final String methodSignature) {
        final byte[] input = methodSignature.getBytes();
        final byte[] hash = Hash.sha3(input);
        return Numeric.toHexString(hash).substring(0, 10);
    }
其中,Function可以由以下例子进行构造:
        Function f = new Function(
                "writeBasicAddressesStruct",
                Arrays.asList(struct),
                Collections.emptyList()
        );
再得到rawdata后就可以通过以下例子进行调用:
String hash = acc.callWithData(new Address(addr), t);
Day5 web3j合约交互问题补充
因为web3j中存在的问题,目前web3j中的codegen会产生错误的代码以及用getlog的方式去获取日志会报 java.lang.UnsupportedOperationException: Array types must be wrapped in a TypeReference的错误
具体的问题描述可以查看https://github.com/web3j/web3j/issues/1726
该问题也是源于对数组的支持不太好,需要等待web3j修复该bug
Week 20 11.28~
11.28 HD Wallet
我们知道,在区块链中控制一个用户账户意味着知道该账户的私钥。而如果我们希望控制一批账户,则意味着我们需要知道每个账户的私钥。如果各个账户的私钥都是独立的,管理这批账户则会变得复杂而繁琐。一种解决方案是使用随机性足够高的随机数种子,从该随机数种子根据特定规则派生出私钥。这种情况下我们只需要知道随机数种子就能够控制一批账户了。
实现这一目的的手段并不唯一,目前被各类钱包软件/硬件广泛采用的标准为 BIP-32 提出的 HD Wallet ,意为分层确定性(Hierarchical Deterministic)钱包。其原理如下图所示,通过逐层派生,最终产生出实际使用的密钥。BIP-44 同时也提出了派生的标准:
m / purpose' / coin_type' / account' / change / address_index
一般通过改变coin_type生成用于不同区块链的私钥,如比特币中会采取coin_type为0,以太坊采取该值为60,Conflux中采取该值为503。
需要注意的是,为了保证HD Wallet的安全,除了需要保证 Master Seed(主随机数种子)不被泄漏外,还需要保证该随机数种子的熵足够高。BIP-32 中规定Master Seed需要在128bit至512bit之间。

11.29 助记词与HD Wallet
HD钱包标准被各类钱包软硬件采用,不过在实际的使用中,用户与开发者更多接触到的概念不是HD钱包的Master Seed(主随机数种子)而是“助记词”。例如当我们第一次使用fluent, metamask等浏览器钱包时,钱包会展示一组助记词并要求我们记下。那么助记词与HD钱包有什么关系呢?
助记词标准由BIP-39 提出。意在解决HD钱包的Master Seed的可读性差、誊写易出错等问题。就助记词的功能而言,助记词是用于产生(HD钱包)种子的种子。PBKDF2(password-based key derivation funciton 2)是常用的从密码(口令)导出密钥的算法,常用于从密码(口令)导出进行加密的密钥,BIP39则使用该函数将助记词导出为HD钱包使用的Master Seed。该函数定义如下:
DK = PBKDF2(PRF, Password, Salt, c, dkLen)
该函数共有5个参数,BIP39中约定的各个参数为:
-
PRF代表导出使用的伪随机函数。BIP-39使用HMAC-SHA512。 -
Password代表导出使用的口令(密码)。PBKDF2原本用于从口令导出密钥,而BIP-39则是需要从助记词导出Master Seed,因此该值使用utf-8编码的助记词。 -
Salt代表导出使用的盐值,调整该值可以改变导出的结果。BIP-39约定将该值默认设为mnemonic。如果需要使用口令保护助记词(如口令为123456),那么该值选为mnemonic+口令(mnemonic123456)。 -
c代表迭代次数。BIP-39约定该值为2048. -
dkLen代表输出值的比特数,BIP-39约定该值为512。
由上可见,只要我们知道助记词(和保护该助记词的口令),就能够通过算法唯一地导出HD Wallet的Master Seed。而相比HD钱包的Master Seed而言,助记词的可读性更好,誊写相对而言不易出错,从而提高了HD钱包的易用性。
11.30 助记词的产生与校验
BIP-39中对助记词的产生方式进行了说明。
-
助记词中可能出现的单词。单词表中挑选了具有辨识度且不易混淆的单词,共2048种,并按字母表顺序排列。
-
助记词的产生与校验。助记词可以认为是对二进制数的特殊编码,如下面的助记词包含12个单词:
nurse silk fiber machine jelly reduce coffee language fox forum cause team
由于每个单词有2048种选择,相当于每个单词都能编码11bit的信息,如第一个单词 nurse 对应 1212(二进制数为10010111100)。该助记词共12个单词,一个长为(12*11=)132bit 的二进制数对应。132位中,前128位需要是随机选取的,后4位为校验位,是前128位哈希值的前4位。
下面为产生一个助记词的完整流程:
- 生成长为
ENTbit的随机数(ENT需要为32的整数倍且128<=ENT<=256),该随机数可以从操作系统获取,如使用python的os.urandom接口。 - 生成校验位。使用SHA256计算
ENTbit的哈希值,并截取前ENT/32位(ENT=128时则为4)。 - 将随机数与校验位拼接后,根据单词表进行编码。每11位可以编码得到一个单词,总共得到
3/32*ENT个单词,即为助记词。
12.1 Keystore 文件
Keystore 文件是一种常见的用于存储私钥的文件格式。一般而言,Keystore文件并不直接存储私钥,而是存储着私钥加密后的密文以及加密的参数等信息,使用时需要通过口令(密码)解密才能获得原始的密钥。如下面是一个示例的keystore文件:
{
    "version": 3,
    "id": "db029583-f1bd-41cc-aeb5-b2ed5b33227b",
    "address": "1cad0b19bb29d4674531d6f115237e16afce377c",
    "crypto": {
        "ciphertext": "3198706577b0880234ecbb5233012a8ca0495bf2cfa2e45121b4f09434187aba",
        "cipherparams": {"iv": "a9a1f9565fd9831e669e8a9a0ec68818"},
        "cipher": "aes-128-ctr",
        "kdf": "scrypt",
        "kdfparams": {
            "dklen": 32,
            "salt": "3ce2d51bed702f2f31545be66fa73d1467d24686059776430df9508407b74231",
            "n": 8192,
            "r": 8,
            "p": 1,
        },
        "mac": "cf73832f328f3d5d1e0ec7b0f9c220facf951e8bba86c9f26e706d2df1e34890",
    },
}
其中ciphertext为加密后的密文,cipher与cipherparams为加密时的参数。kdf与kdfparams代表如何由口令得到加密使用的密钥。不过需要注意的是,即使keystore文件是经过加密的私钥文件,该文件也需要保证安全,尽量避免泄露。当加密密码设置得并不复杂时,攻击者可以通过暴力搜索的方式搜索可能的解密密码。
目前各类SDK均支持对Keystore文件的操作,读者可以阅读相关文档(如js-sdk)了解如何使用Keystore文件
12.2 如何安全地产生私钥?
私钥安全是区块链安全的重中之重。而安全地产生私钥则是私钥安全的首要条件。做到这一点需要选用熵足够高(即随机性足够高——足够长且难以预测)的种子作为产生私钥的随机源。典型的错误用法是直接使用各个语言提供的random接口,如python的random.random,java的java.util.random,这些接口提供的随机数是通过特定算法产生的伪随机数:其分布具备随机数的特性,能满足日常使用的需求,但是可预测非常高,因此不能用于产生私钥。再如wintermute的私钥被盗事件就是因为产生私钥的种子长度不足。
目前各个语言的SDK都内置了生成私钥的API,这些API都是如何获取随机性、产生私钥的呢?答案来自于操作系统。以Linux为例,系统会收集噪声数据,将产生的随机流置于/dev/urandom与/dev/random中。通过读取文件中的数据,就能够获得来自操作系统的真随机数了。一般而言,在获取到足够长的真随机数后,SDK还会将该随机数与用户提供的随机性混合,进行一次哈希,最终得到私钥。python中的实现如下:
extra_key_bytes = text_if_str(to_bytes, extra_entropy)
key_bytes = keccak(os.urandom(32) + extra_key_bytes)
一般而言,SDK使用的随机数来自于/dev/urandom文件。urandom中的u意味着"unblock"(非阻塞),/dev/random会在操作系统提供的熵不足时阻塞,/dev/urandom则不会,这意味着特定情况下/dev/urandom能提供的随机性会低于/dev/random,但在绝大多数情况下,使用/dev/urandom已经足以满足产生私钥的安全性需求。如果确实对随机性有着严格的需求,可以参考以下代码,从/dev/random中获取随机性。
with open("/dev/random", 'rb') as f:
    print(f.read(32).hex())
需要注意的是,上述提到的要求不止适用于产生私钥,产生助记词等对随机性有要求的场景都是适用的。
Gas 科普
Conflux 用户在使用钱包(Fluent)或 SDK 发送交易时,经常会看到gasFee(燃气费), gas(燃气上限) 和 gasPrice(燃气价格) 那这些概念的具体含义是什么,又该如何合理的设置 gas 和 gasPrice,本文将会为你做详细讲解。
gasFee
现实世界中我们去银行办理转账业务的时候通常需要支付一定的手续费,在区块链世界(比特币,以太坊,Conflux)中发送交易也是如此,gasFee 即是交易发送的手续费, 通常手续费需要使用区块链的原生代币来支付,比如在 Conflux 发送交易,需要使用 CFX 来支付交易手续费(燃气费)。
为什么要支付手续费
众所周知区块链是一个去中心化账本,而账本的维护工作是由矿工来完成的。而矿工存储数据,参与出块(计算哈希)是有一定成本的。为了激励矿工积极参与维护账本,并保护网络的安全,区块链共识系统在设计时即包含了对矿工的奖励机制,而交易手续费即是矿工的奖励之一,会被支付给参与出块的矿工。该机制可以保证整个去中心化网络的持久健康发展。
另外手续费机制也可以防止滥发交易,提高区块链网络资源的有效利用。
gas 燃气
gas 按字面意思来看是燃气,汽油。汽车燃烧汽油来提供动力来完成行驶和移动。汽车行驶的距离越远,所消耗的汽油越多。EVM 区块链世界中借用了该概念来用于表示交易执行所需付出工作量的多少,所以 Gas是一个单位,用于测量执行某些操作所需的计算量。
更详细的来讲,Conflux 的所有交易都是由 EVM 来完成执行的,包括普通的 CFX 转账以及智能合约方法调用。而这些操作最终执行时,会被编译为一个个 OPCode 来被执行,不同的 OPCode 执行所需要的工作量也不同,具体各 Opcode 执行所花费燃气量可参看
通常普通 CFX 转账交易消耗的 gas 为 21000, 智能合约交互交易所需 gas 通常比较多,为几万到几十万不等,跟合约执行的复杂程度有关。
gas 上限
构造交易时,gas 字段非常重要,该字段的本身含义是本笔交易执行所能消耗的燃气上限。
交易 gas 的正确填写非常重要,如果设置的 gas 上限比实际执行所需燃气量小的话,交易会执行失败。如果 gas 上限设置过大,则有可能会导致支付比实际所需更多的燃气费
在 Conflux 网络单笔交易的最大燃气上限为 1500w, 该机制保证了交易不会无限制占用 EVM 计算资源。
gasPrice
交易的 gasPrice 是由交易发送者指定的,表示愿意为每单位燃气所支付的费用,其单位为 GDrip, 1 GDrip 等于 0.000000001 CFX (10^-9 CFX)。
交易 gasPrice 值的大小会影响交易被矿工打包的速度,因为矿工会优先打包 gasPrice 更高的交易,这样他们的收益才会更高。在网络不拥堵的情况下 gasPrice 设置为 1Gdrip 即可正常被打包,但在网络拥堵时,等待打包的交易很多,这时如果 gasPrice 值设置的比其他大部分交易小的话,会一直等待,迟迟不被打包。
所以如果想让交易快速被打包,设置一个比较大的 gasPrice 即可,在 Conflux 网络通常 10G-1000G gasPrice 即是一个比较大价格,可以保证交易被快速执行。
NOTE:gasPrice 也不能设置过大,这样会导致天价交易费用的交易,比如如果把 gasPrice 设置为 1CFX,那一笔普通转账交易的手续费为 21000 CFX,这是一个非常大的数值。
gasFee 的计算方式
gasFee 是为某笔交易支付的燃气费总费用,其金额计算方式为 gasFee = gasUsed * gasPrice。gasFee 的单位为 CFX 的最小单位 Drip。
假设发送一笔金额为 1CFX 的普通交易,这时交易的 gas 上限可直接设置为 21000, 如果将 gasPrice 设置为 1GDrip,则发送该笔交易一共需要支付 1 + 21000 * 0.000000001 = 1.000021 CFX. 其中 1CFX 会转到接收者账户中,另外 0.000021 会奖励给矿工。
另外在 Conflux 网络中,交易燃气上限比交易实际执行所消耗燃气(gasUsed)多的部分会进行返还,但最多只会返还 gas 上限的四分之一。
假设一笔普通 CFX 交易的 gas 上限设置为了 10w,交易的实际执行用量为 21000,但因为交易的燃气上限设置过大,所以最多只会返回 25000 燃气的费用,使用的交易燃气费为 0.000075 CFX.
如果交易燃气设置不是过大,比如还是上述的这笔交易,燃气上限设置为了 25000, 比实际使用量多了 4000,没有超过燃气上限的四分之一,多出的部分会全部返还,最终收取手续费数量还是 0.000021 CFX
如何正确的设置 gas 和 gasPrice
gasPrice
通常 gasPrice 的设置范围为 1-10000G,在网络不拥堵的情况直接使用 1G 即可,如果交易发出后等待时间过长,可将交易 gasPrice 提高到 10G 或 100G。
gas
对于普通的 CFX 转账交易,直接将 gas 设置为 21000 即可。
对于合约交互交易则一般通过 cfx_estimateGasAndCollateral 方法来进行预估, 该方法会模拟执行交易,在gasUsed字段中返回交易实际使用的 gas 数量。但由于在EVM中每次子函数调用只会传入63/64的gasLimit,将gasLimit直接设置为gasUsed常常会因gas不足而导致交易失败。通常推荐将cfx_estimateGasAndCollateral返回的gasLimit字段设置为交易的燃气上限,该值为gasUsed的4/3倍。这样一般可以保证 gas 上限设置得足够,多余的燃气也可以全额返还。
FAQs
1. Conflux 网络中是否有跟以太坊 1559 类似的交易?
目前 Conflux 网络中只有跟以太坊 155 格式相对应的交易
扩展阅读
EN Translate
Gas
Conflux users usually see fields like gasFee, gas, and gasPrice when they are sending transactions using their wallets (Fluent) or SDK. This article is going to explain in detail about what these concepts mean and how to set the values properly.
gasFee
In real life, when we send money to someone else at a bank, we usually have to pay transaction fees. It is the same for sending transactions in blockchains (Bitcoin, Ethereum, Conflux). gasFee is the fee for sending a transaction. Usually, it needs to be paid by the native token of the chain. Take Conflux as an example, CFX is needed for paying the transaction fee (gas fee).
Why Pay Fees
As we all know, blockchain is in fact a decentralized ledger, which is maintained by miners. There is a cost for miners to store data and generate blocks (calculating hashes). Therefore, in order to motivate miners to actively participate in the chain maintenance and protect the network security, the blockchain consensus system is designed to include a reward mechanism for miners, and the transaction fee is one of the rewards for miners, which will be paid to miners who participate in generating blocks. This mechanism can ensure the sustainability of the entire decentralized network.
In addition, the gas fee mechanism can also prevent abusive transactions and thus improve the efficiency of blockchain utilization.
What is Gas
The concept of gas is borrowed from the real 'gas', petrol. Vehicles consume gasoline to drive. The further a car travels, the more gasoline it consumes. In EVM blockchains, gas represents the work amount required to execute a transaction. Therefore, it is a unit that measures the amount of computation required to perform certain operations.
To provide more details, all Conflux transactions are executed by EVM, including regular CFX transfers and smart contract method calls. When these operations are executed, they are compiled into individual OPCodes. The amount of work required to execute each OPCode varies. More information for OPCode gas fees can be found here.
Usually, the gas consumed for a regular CFX transfer is 21000. A smart contract transaction usually needs more, depending on the complexity of the contract execution.
Gas Limit
When constructing a transaction, the gas field is very important, as the field itself means the maximum amount of gas that can be consumed by the execution of the transaction.
It is very important to fill the gas field correctly. If the gas limit is set to a value less than the actual amount of gas needed, the transaction will fail. If the gas limit is set too high, you may pay more gas than you actually need to.
The maximum gas limit for a single transaction in the Conflux network is 15M. This ensures that the transactions will not overconsume EVM resources.
gasPrice
The gasPrice of a transaction is specified by the sender of the transaction and represents the fee that the person is willing to pay per unit of gas. The unit of gasPrice is GDrip, where 1 GDrip is equal to 0.000000001 CFX (10-9 CFX).
A transaction's gasPrice value affects how fast the transaction is packaged by miners, as miners will prioritize packaging transactions with higher gasPrice in order to make more profits. When the network is not congested, setting gasPrice to 1Gdrip is enough to be packed normally. However, when the network is congested, more transactions are waiting to be packed. At this time, if the gasPrice is set to be less than most other transactions, it will not be packed but keep waiting.
Therefore, if you want the transaction to be packaged quickly, you can set the gasPrice higher. Usually setting it to 10G-1000G is high enough in Conflux to ensure it is executed quickly.
NOTE: Do not set gasPrice too high. It may lead to sky-high transaction fees. If gasPrice is set to 1CFX, then the fee for a regular transfer is 21000 CFX, which is quite a lot for a transaction.
How gasFee is Calculated
gasFee is the total gas fee paid for a transaction. It is calculated as gasFee = gasUsed * gasPrice. gasFee takes the smallest unit of CFX, Drip.
Suppose there is a regular transfer of 1 CFX, the gas limit can be set to 21,000. If the gasPrice is set to 1GDrip, then the total cost of the transaction is 1 + 21000 * 0.000000001 = 1.000021 CFX, where 1 CFX is transferred to the recipient's account, and 0.000021 CFX is the reward for the miner.
In addition, in a Conflux transaction, if the gas limit is more than the actual amount of gas consumed (gasUsed), the exceeding part will be returned. The returning amount of gas can only be up to a quarter of the gas limit.
Suppose the gas limit for a regular CFX transfer is set to 100k and the actual execution consumed 21,000, since the gas limit for the transaction is set too high, at most 25,000 of the gas fee will be returned(25% of the gas limit). The gas used for the transaction will be 0.000075 CFX.
If the gas limit setting of the transaction is not that high, take the same example as above but set the gas limit to 25000, which is 4000 more than the actual amount used, the exceeding part is not more than a quarter of the gas limit. This part will be returned fully, and the final amount of fees charged will still be 0.000021 CFX.
How to Set gas and gasPrice Properly
gasPrice
Usually, gasPrice can be set within the range of 1G to 10,000G. If the network is not congested, 1G would be enough. If the waiting time after sending the transaction is too long, you can set the gasPrice to 10G or 100G.
gas
For regular CFX transfers, setting the gas to 21,000 is enough.
For contract interactions, you can estimate the gas value by using the method cfx_estimateGasAndCollateral, which simulates the execution of the transaction and returns the actual amount of gas used for the transaction. In most cases the value returned by this method is accurate, but sometimes there could be underestimations. A safe way of dealing with this is to multiply the result of the estimation by a factor 1.3. This ensures that the gas limit is sufficient for the transaction, and any excessive gas fee will be refunded.
FAQs
1. Are there any EIP-1559 transactions in the Conflux network?
Currently, in the Conflux network, there are only transactions that correspond to the EIP-155 standard.
Further Readings
Accounts
Account is a very important object entity in the Conflux network. It is used to store CFX (every account has its CFX balance) and send Conflux transactions. Accounts and account balances are stored in a huge table in the Conflux VM, and they are part of the full state of the Conflux ledger.
Types of Accounts
Conflux has two types of accounts.
- External accounts (private key accounts) - are controlled by the holder of the private key
- Smart Contracts - are the ones deployed in the network and controlled by the contract codes
Note: There is a special type of smart contract in the Conflux network - the internal contracts. They are created automatically when the network is started or upgraded, but not by deploying contract codes. There are currently 6 internal contracts.
Similarities of Accounts
- Both of them can accept, hold, and send CFX and tokens
- Both of them can interact with smart contracts in the network
Differences of Accounts
External Accounts
- Creating external accounts does not have costs, such as CFX or other resources
- They can send transactions to others
- Transactions between external accounts can only be CFX or token transactions
Smart Contracts
- Creating smart contracts does have costs, as it uses the network's storage and computational resources
- Transactions can only be sent to other contracts as a response to a received transaction
- Transactions sent from external accounts to contract accounts can trigger the smart contract's codes to perform many different operations, such as token transfers, creating new contracts, etc.
External Accounts and Public-private Key Pairs
An external account is generated by a public-private key pair that can be used to prove that a transaction was indeed signed by the account, in order to prevent transaction falsification. The private key is used by the user to sign a transaction. It gives you the right to operate the assets on the account corresponding to the private key. Essentially, the user does not hold the CFX or the tokens but the private key. CFX is always present in Conflux's ledger.
This mechanism prevents malicious users from broadcasting fake transactions, as we can verify the address that sends the transaction at any time.
For example, if Alice wants to send CFX from her account to Bob's account, she needs to create a transaction and send it to the network for verification. Conflux uses the public key encryption mechanism to ensure that Alice can prove that the transaction is sent by herself. Suppose now, Eve, a malicious user, directly broadcasts a transaction, say, "send 5 CFX from Alice's account to Eve's account". Without the above-mentioned mechanism, no one would be able to verify that the transaction was sent by Alice.
External Account Creation
When you want to create an external account, you can use a wallet, like FluentWallet, or any language library, where essentially both of them generate a random private key.
A private key contains 64 hexadecimal characters and can be encrypted using a password.
fffffffffffffffffffffffffffffffebaaedce6af48a03bbfd25e8cd036415f
The public key is calculated from the private key by the Elliptic Curve Cryptography Algorithm. Then, Keccak-256 hashing is performed on the public key, and the Conflux address is yielded by encoding the last 20 bytes (the first 4 bit will be set to 0001) of the result with base 32 formats.
// Mainnet address
cfx:aatktb2te25ub7dmyag3p8bbdgr31vrbeackztm2rj
// Testnet address
cfxtest:aatktb2te25ub7dmyag3p8bbdgr31vrbeajcg9pwkc
The public key can be calculated from the private key, but the private key cannot be calculated from the public key. The private key has to be kept safe by the user.
Smart Contract Account
Smart contracts also have base32 encoded addresses
cfx:acf2rcsh8payyxpg6xj7b0ztswwh81ute60tsw35j7
This address is determined when the contract is deployed and is calculated by the deployed transaction's sender address, nonce, and the smart contract's code.
Note: The addresses of internal contracts are special - they are assigned by the network itself.
Details of Accounts
The global state of Conflux is composed of individual account states, each of which is an address-state pair (key pair).
A Conflux account state includes five parts:
-
Basic stateis the basic state of the account. -
Storage stateis a key/value database or storage space that can be used to store custom states or data of smart contracts. -
Code informationis the code information of the smart contract account. It includes thecontract codesand theaddressof the account that paid the fee for the storage space occupied by the codes. -
Staking deposit listis the list of Staking operations of the accounts (it will be removed in the next Hardfork). -
Staking vote lock listis the list of lock operations performed by the account to participate in DAO voting.
The basic status of the account consists of eight fields as follows:
-
nonceis a counter to keep track of the number of transactions sent by an account. It is also used to ensure that each transaction can only be executed once. For contract accounts, this value indicates the number ofcontracts created by this contract. -
balanceis the number of CFX of the address in Drip. Drip is the smallest unit of CFX, where 1CFX=1018 Drip. -
codeHashis the hash of the code of the contract account. The user can reference the contract code, the code cannot be modified after the contract is created. The code will be executed when the contract receives a message call. For external accounts, codeHash is a hash of an empty string. -
stakingBalanceis the balance of the staked amount. Similarly, the unit is Drip. -
adminis the administrator address of thecontract accountrecorded in the AdminControl internal contract. In default, the contract administrator is set to the account which deployed this contract when it is created. The administrator can destroy the contract it manages through the internal contract AdminControl, or give the administrator role to another account. The administrator address of an external account is itself. -
sponsorInfois the information of the contract sponsor. It containssponsor for gas,sponsor for collateral,sponsor gas limit,sponsor balance for gas, andsponsor balance for collateral. -
storageCollateralis the amount of Drip staked to use the storage spaces. -
accumulatedInterestReturnis the amount of cumulative reward of the account from Staking. The unit of it is Drip. Starting with Conflux 2.0, users must also participate in PoS in order to receive the reward.
For more details about accounts, please refer to the Accounts section in Conflux Protocol Specification.
Accounts
账户在 Conflux 区块链网络中是一个非常重要的实体对象,可用来存放 CFX (账户有 CFX 余额),以及发送 Conflux 交易。账户以及账户余额被存储在 Conflux VM 的一个大数据表中,它们是 Conflux 账本全状态的一部分。
账户的类型
Conflux 有两种类型账户:
- 外部账户(私钥账户)- 被私钥的持有者控制
- 智能合约 - 是一个部署在网络中的智能合约,被合约代码所控制
备注:Conflux 网络中有一种特殊的智能合约账户 -- 内置合约, 他们是网络启动或升级时自动创建,而非通过合约代码部署创建,目前 Conflux 网络有 6 个内置合约。
相同点
- 都可以接受,持有,发送 CFX 和 tokens
- 都能与网络中的智能合约交互
异同点
外部账户
- 账户创建不需要消耗 CFX 或其他资源
- 可以主动发送交易
- 外部账户间的交易只能是 CFX 或 tokens 转账
智能合约
- 合约账户的创建有成本,因为使用了网络的存储和计算资源
- 只有在接收到交易进行响应时,可对其他合约发出交易
- 外部账户发送给合约账户的交易,可触发智能合约的代码,完成许多不同的操作,例如 tokens 转账,创建新合约等等。
外部账户与公私钥对
一个外部账户是由一对加密公私钥产生的,它们可以用来证明一个交易真的是由某个账户签署的,防止交易伪造。私钥是用户用来签署交易的,它可以给你操作私钥对应账户上资金的权利。 本质上用户并不持有 CFX 或 token,而是持有私钥,CFX 永远存在于 Conflux 的账本中。
这种机制可以避免恶意的人员,广播假交易,因为我们随时可以验证交易的发送地址。
举个例子。Alice 想从自己拥有的账户发送 CFX 给 Bob 的账户,Alice 需要创建一个交易,并发送到网络中进行验证。Conflux 使用公开秘钥加密机制来确保 Alice 可以证明这笔交易就是由 Alice 本人发出的。没有这个机制一个恶意的第三用户 Eve 可以直接广播一笔交易 ”从 Alice 的账户发送 5 CFX 到 Eve 账户“ 并且也没有人能够验证交易是由 Alice 发出来的。
外部账户创建
当你想创建一个外部账户,你可以使用钱包比如 FluentWallet,也可以使用开发语言的库,本质上他们是随机生成了一个私钥。
一个私钥包含 64 个 hex 字符,可以使用密码进行加密。
fffffffffffffffffffffffffffffffebaaedce6af48a03bbfd25e8cd036415f
公钥则是通过椭圆曲线加密算法从私钥计算出来的,然后对公钥进行 Keccak-256 哈希计算,取最后 20 字节,然后进行base32 编码即是 Conflux 地址。
// 主网地址
cfx:aatktb2te25ub7dmyag3p8bbdgr31vrbeackztm2rj
// 测试网地址
cfxtest:aatktb2te25ub7dmyag3p8bbdgr31vrbeajcg9pwkc
通过私钥可以推算出公钥,但反之则不行,私钥需要用户自己妥善保管
智能合约账户
合约账户同样有一个 base32 编码的地址
cfx:acf2rcsh8payyxpg6xj7b0ztswwh81ute60tsw35j7
该地址是在合约被部署时确定的,是通过部署交易发送账户地址,及其 nonce 以及合约的代码计算出来的。
注:内置合约账户地址是由网络自行分配的,比较特殊
账户详解
Conflux 的全局状态是由一个个账户状态组成,每个账户是一个 账户地址-账户状态对(key pair)
一个 Conflux 账户状态包含五部分:
-
基本状态账户的基本状态 -
存储状态是一个 key/value 的数据库或存储空间,可用于存储一些智能合约自定义的数据或状态 -
代码信息智能合约账户的代码信息,包含合约代码以及为代码所占用存储空间支付抵押费用的账户地址 -
Staking deposit 列表账户参与 Staking 的质押操作列表 (该列表将在下个 Hardfork 移除) -
Staking vote lock 列表账户为参与 DAO 投票,而进行的锁定操作列表
其中账户的基本状态又由如下八个字段组成:
-
nonce一个计数器用来记录某账户发送交易的数量,该计数器同时用来确保交易只会被执行一次。对于合约账户,此数值则表示被该合约创建的合约的数量。 -
balance该账户地址所用户的 Drip 数量,Drip 是 CFX 的最小单位,1CFX=1e+18 Drip -
codeHash合约账户代码的 hash,用户快速引用合约代码,合约创建后代码不可修改,在合约接收到 message call 的时候,其代码将会被执行;对于普通账户 codeHash 是一个空字符串 hash -
stakingBalance账户参与 Staking 的余额,单位同样是 Drip -
adminAdminControl 内置合约所记录的合约账户的管理员地址,合约账户管理员在创建时被默认设置为部署账户地址,管理员可通过 AdminControl 内置合约销毁掉其所管理的合约,也可将管理员身份移交给其他账户;外部账户的管理员地址为其本身 -
sponsorInfo合约账户的赞助者信息:包含sponsor for gas,sponsor for collateral,sponsor gas limit,sponsor balance for gas以及sponsor balance for collateral -
storageCollateral账户为占用存储所抵押的 Drip 数量 -
accumulatedInterestReturn账户参与 Staking 所获得的累计收益数量,单位为 Drip,从 Conflux 2.0 开始,用户需同时参与 PoS 才能获得奖励。
关于账户的更详细介绍可参看 Conflux 黄皮书的 Accounts 部分
Token Standard
ERC4626-Tokenized Vault Standard
Core Space 与 eSpace 互操作介绍
Conflux 在 2.0 升级中引入了一个独立的 EVM 完全兼容空间 eSpace。该空间可以被认为是一个与以太坊等效的独立区块链,并且与原有的 Conflux 链也相互独立。为了解决两条链之间的互操作问题,此次升级同步引入了一个新的内置合约 CrossSpaceCall 用于实现 CFX 互跨,以及数据,状态的通信。
映射地址(mirror address)
关于映射地址参看此篇介绍
CrossSpaceCall 内置合约
假设我们在 eSpace 部署了一个非常简单的合约 Counter 地址为 0xc655a016f2ebe30f0dbe1a957d439104e05451e9。现在我们演示如何在 Core 空间合约中通过 CrossSpaceCall 内置合约同 Counter 合约进行交互(读取,更新)。
// SPDX-License-Identifier: UNLICENSED
pragma solidity ^0.8.13;

contract Counter {
    uint256 public number;

    function setNumber(uint256 newNumber) public {
        number = newNumber;
    }

    function increment() public {
        number++;
    }
}
这样我们就可以在 Core 中开发并部署一个合约,该合约通过 CrossSpaceCall 内置合约实例,可以在 eSpace 中的 Counter 合约中读取,写入数据。
// SPDX-License-Identifier: UNLICENSED
pragma solidity ^0.8.13;

import "@confluxfans/contracts/InternalContracts/CrossSpaceCall.sol";

contract CrossSpaceDemo {
    CrossSpaceCall crossSpaceCall = CrossSpaceCall(0x0888000000000000000000000000000000000006);

    address eSpaceCounterAddr = 0xc655A016f2eBE30f0DBe1A957D439104E05451e9;

    function setNumber(uint256 newNumber) public {
        // use abi.encodeWithSignature method to build the method call data
        crossSpaceCall.callEVM(bytes20(eSpaceCounterAddr), abi.encodeWithSignature("setNumber(uint256 newNumber)", newNumber));
    }

    function getNumber() public returns (uint256) {
        bytes memory num = crossSpaceCall.callEVM(bytes20(eSpaceCounterAddr), abi.encodeWithSignature("number()"));
        // use abi.decode to decode data
        return abi.decode(num, (uint256));
    }
}